I’ve tried to make the process easier by doing my own research and breaking down some of the most popular sticks on the market, covering the specs and best features of each, then comparing those features with the price tag to help you make a decision you’ll be happy with for seasons to come.
By the way, I’d love to hear your thoughts, as well. Be sure to drop your experience with different climbing sticks in the comments section below.
- Best Overall: Tethrd One Climbing Sticks
- Runner Up: Latitude Carbon SS Climbing Sticks
- Best Value: XOP X2s
- Another Great Option: Tethrd Skeletors
- Best Budget Option: Muddy Pro Climbing Sticks
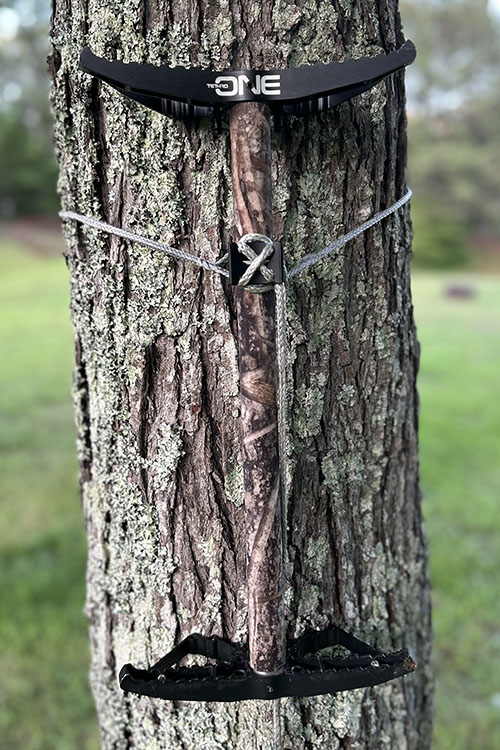
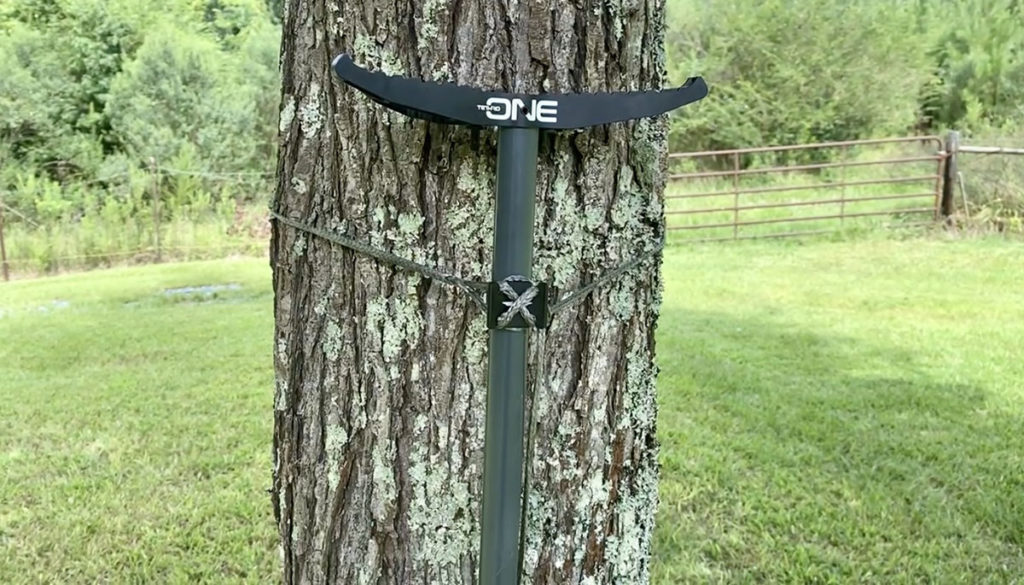
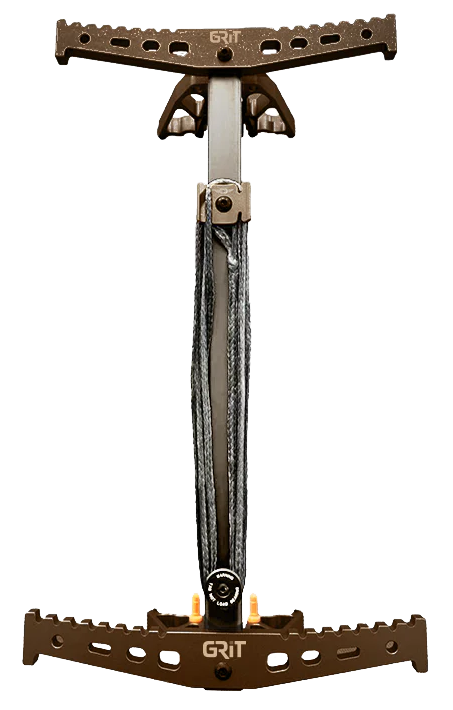
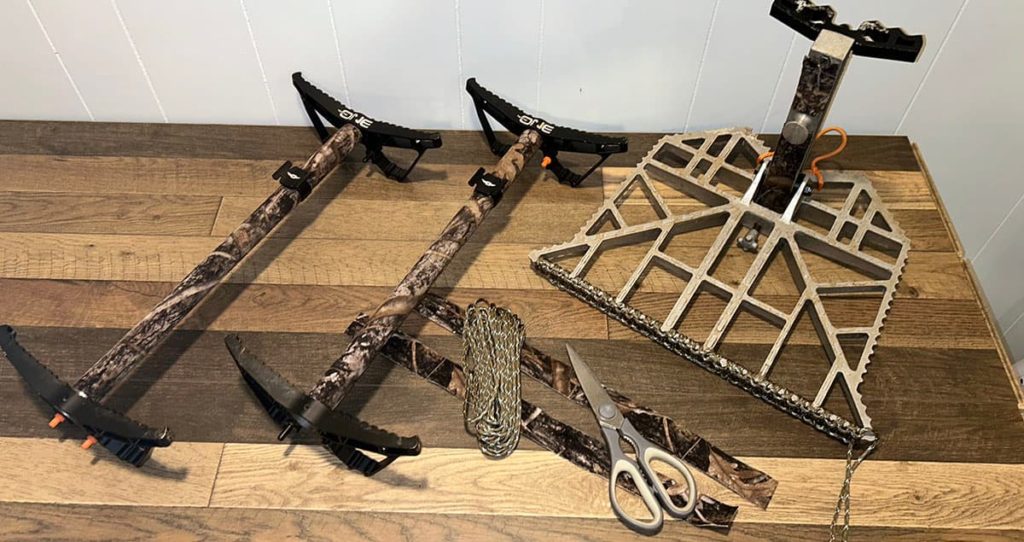
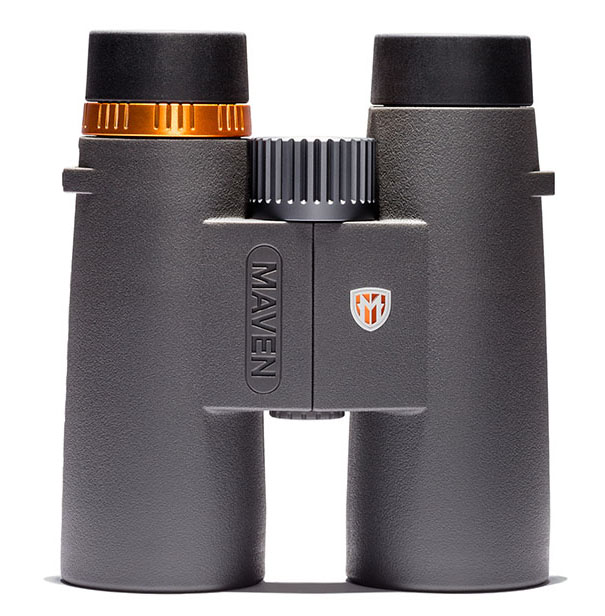
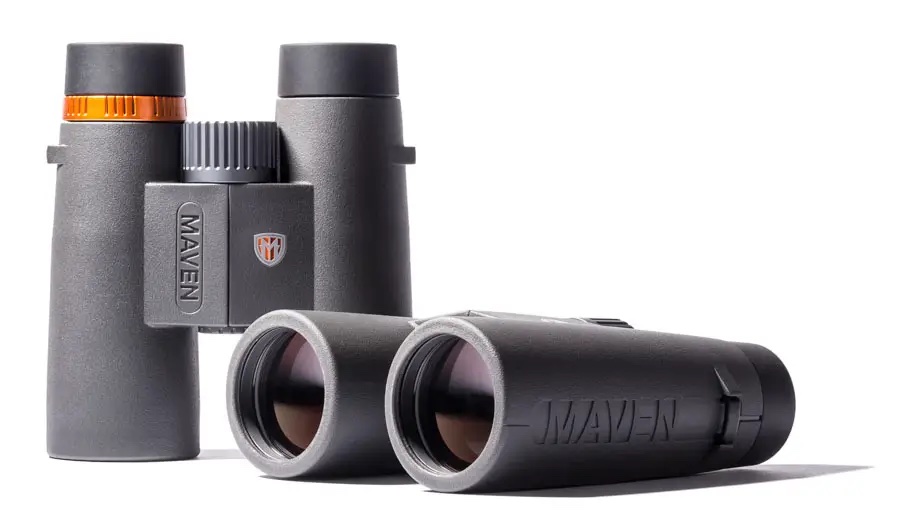
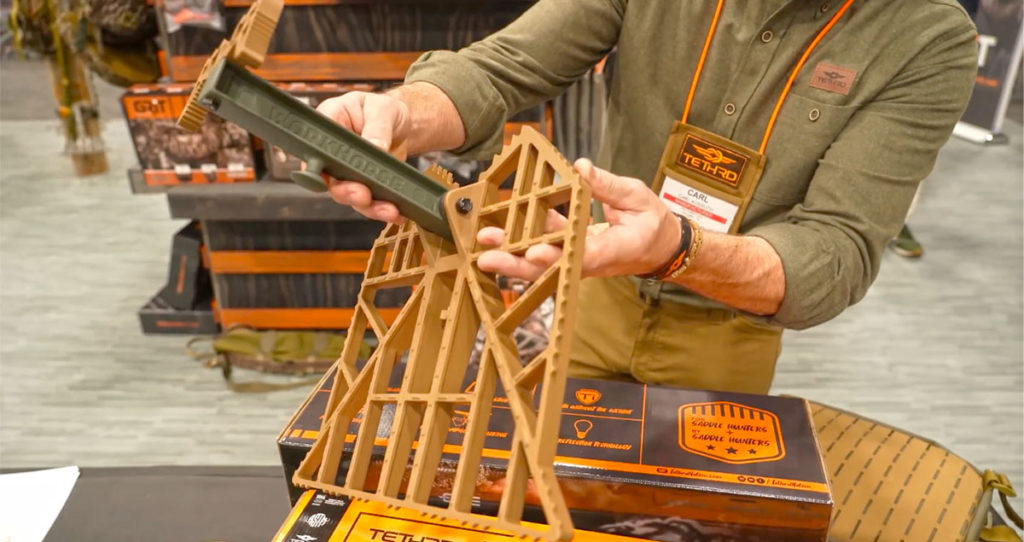
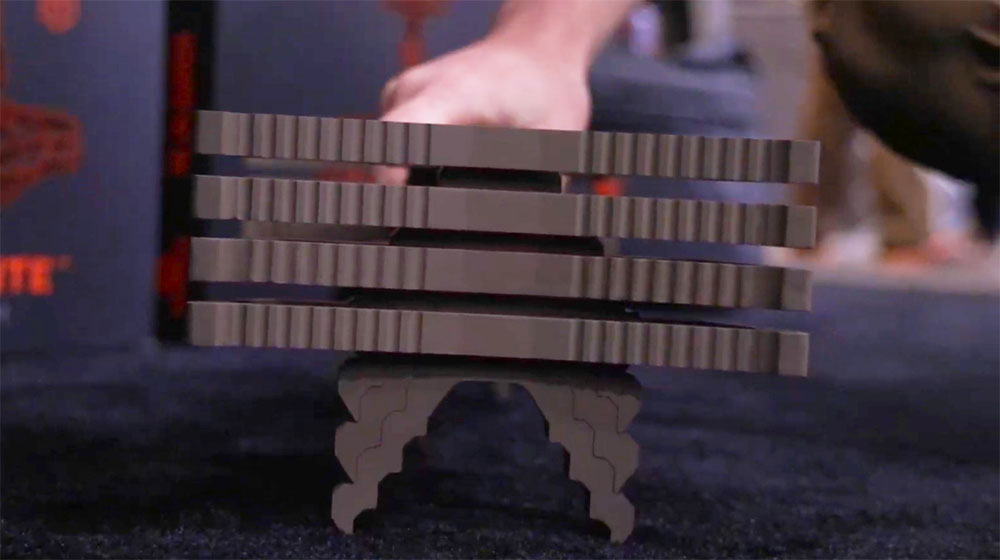
Best Overall: Tethrd One Sticks
Specs:
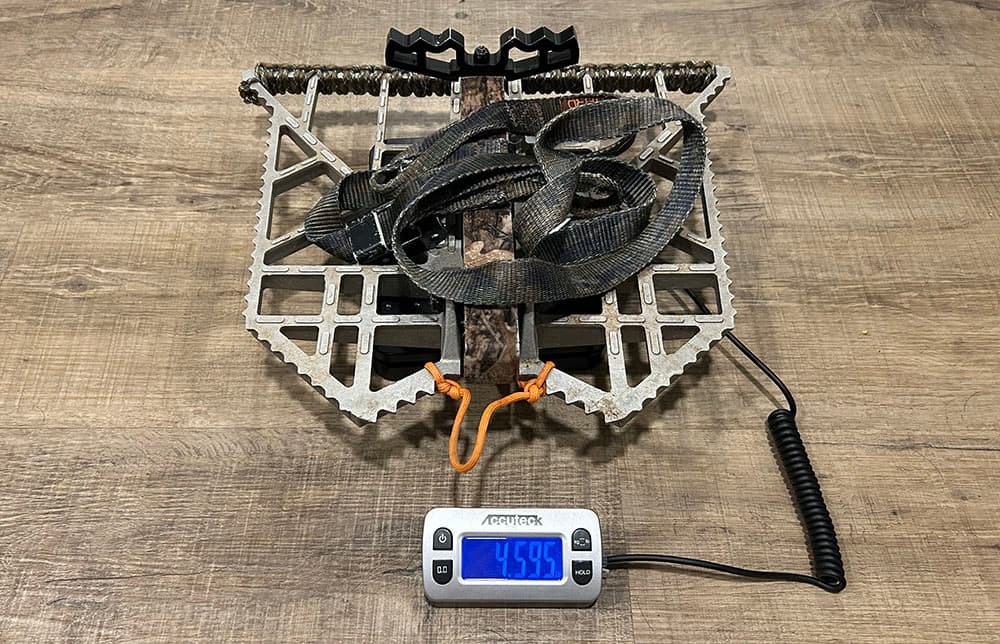
Length: 18.5 inches
Weight: 15.9 ounces including the attachment rope
Weight Limit: 300 lbs
Step Configuation: Dual steps
Sold in a pack of three
What I Like:
- Lightest sticks on the market that I’m aware of
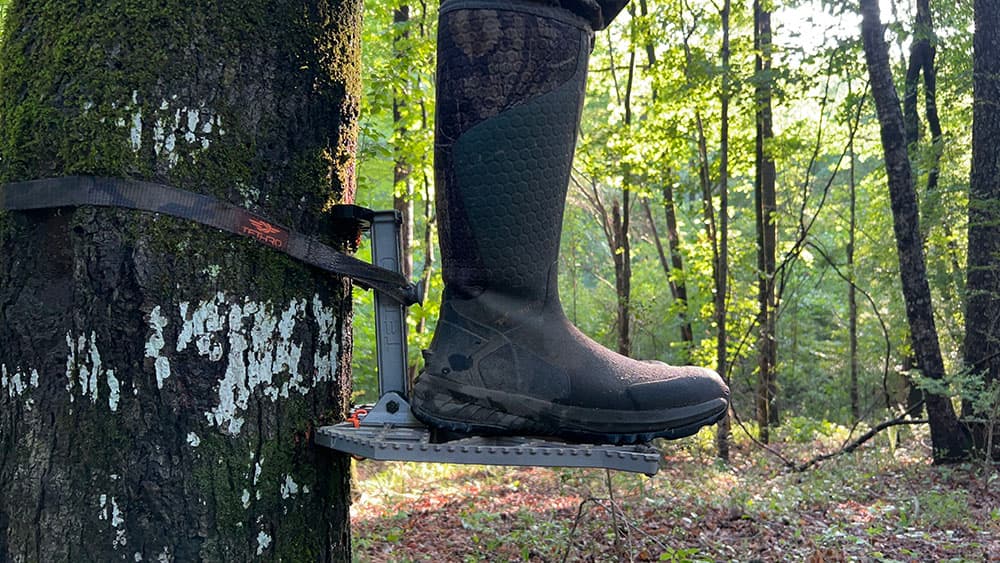
- Steps point away from the tree like the Skeletors
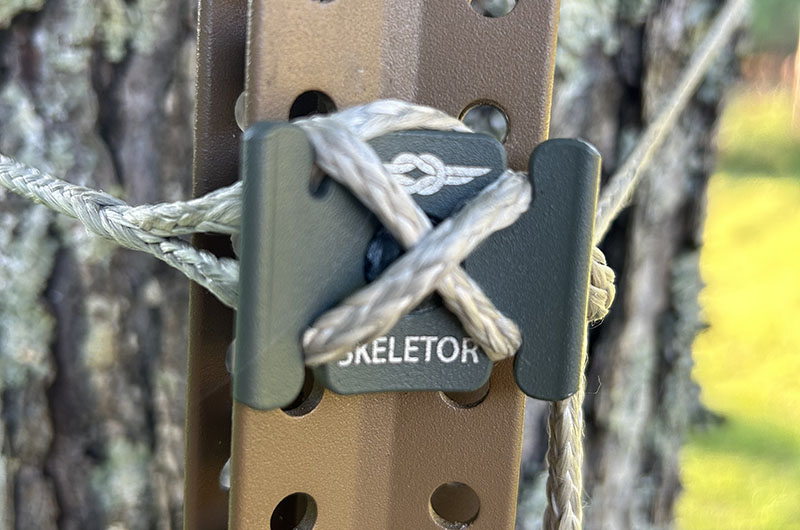
- Dynaloc Tab and Dynalight rope attachment method
- Glow tabs on each step help you see them in the dark
- StickLoc pin system
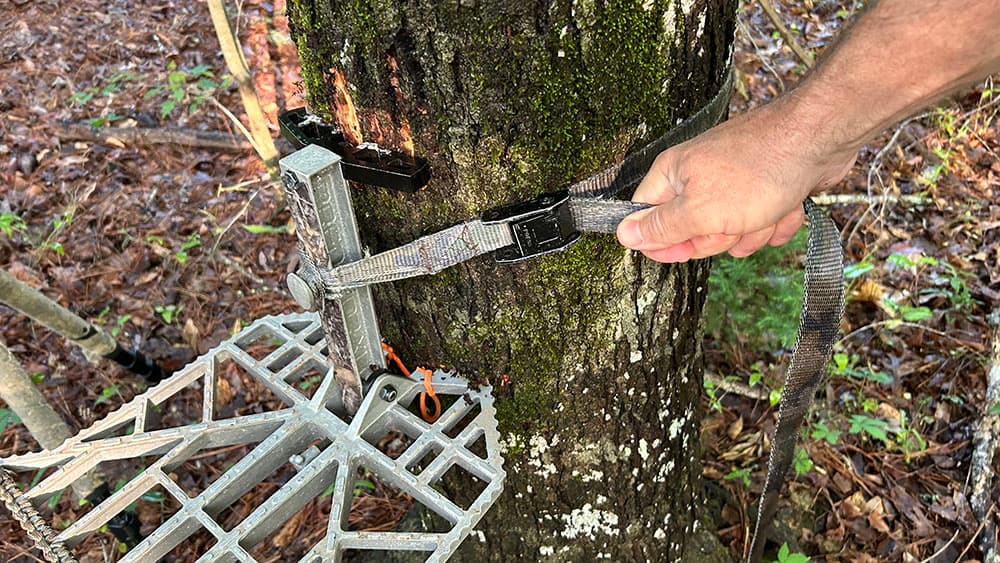
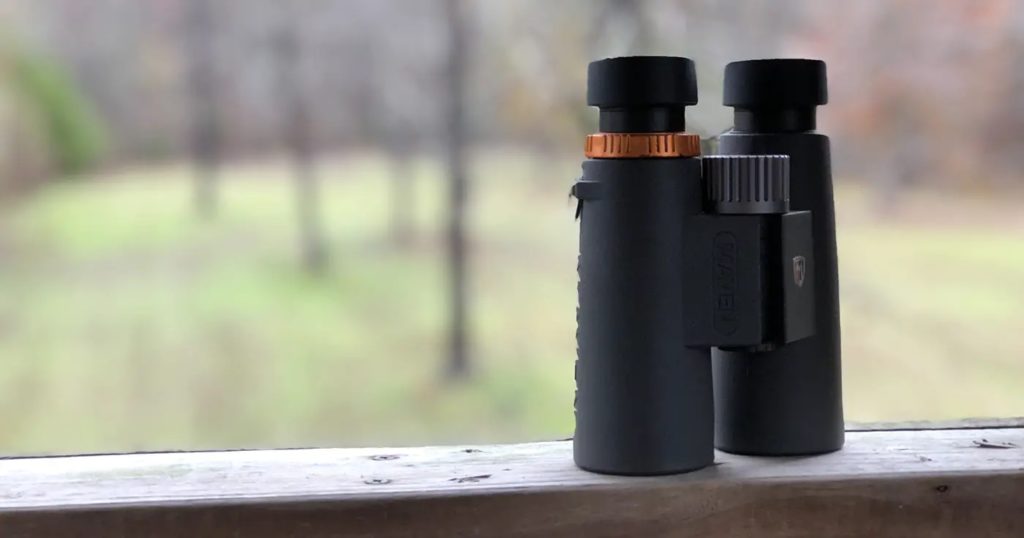
As I mentioned above, Tethrd One sticks are what I use, and my only complaint since I’ve owned them is that a few of my StickLoc pins that hold the sticks together during transport broke. It was a common issue with when they were first released, but has since been resolved with new pins.
Tethrd One climbing sticks are super lightweight at 15.9 ounces each. That’s thanks to the titanium tubes and 6061 aluminum machined steps. I would recommend putting some Stealth Strips on the hollow tubes because they can be pretty noisy if you accidentally hit them together during setup.
Runner Up: Latitude Carbon SS
Specs:
Length: 18 inches
Weight: 19 ounces per stick
Weight rating: 275 pounds
Step Configuration: Non-folding double steps
Sold in packs of 3, 4, 6, 8 or 12.
What I Like:
- Strong one-piece carbon fiber design
- No metal parts to make noise
- Super lightweight at just 19 ounces each
- Fast, quiet Amsteel attachment method
- Made in the USA with 5 year warranty
Latitude is known for great quality saddles, but last year all the attention was focused on their new one-piece carbon climbing sticks. And it’s easy to see why. They hit a home run with their Carbon SS sticks.
Using technology from the automotive and aerospace industries, Latitude created a solid, lightweight stick that rivals anything on the market. The one-piece, metal free design will help you stay quiet during setup and tear down, and the Amsteel attachment method allows you to quickly mount the sticks to the tree.
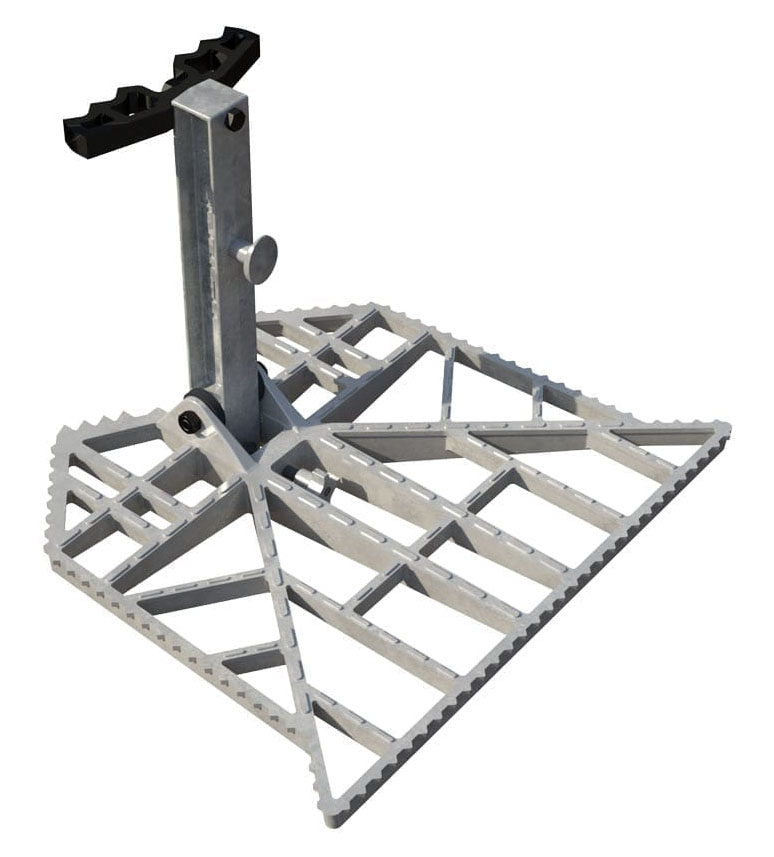
Best Value: XOP X2s

Specs:
Length: 18 inches
Weight: 26 ounces per stick (1.625 lbs)
Weight rating: 350 pounds
Step Configuration: Non-folding double steps
Sold in four packs
What I Like:
- Easily stackable with two options – on top of each other or side-by-side.
- Reasonably priced for the included features
- You get four sticks
XOP offers a wide variety of climbing sticks including a pivoting step, two-step stick; a fixed step, two step stick; and a pivoting step, three-step stick. For the purpose of this buying guide, we’re going to look at the XOP X2 fixed double-step sticks.
The XOP climbing sticks feature a unique slide-lock technology that allows you to neatly stack them on top of each other or flush side-to-side for low profile transport. The large 10-inch steps and increased stand-off offers plenty of grip and foot room for even the largest boots. XOP’s sticks are crafted from powder-coated 6061 aluminum.
Another Great Option: Tethrd Skeletors
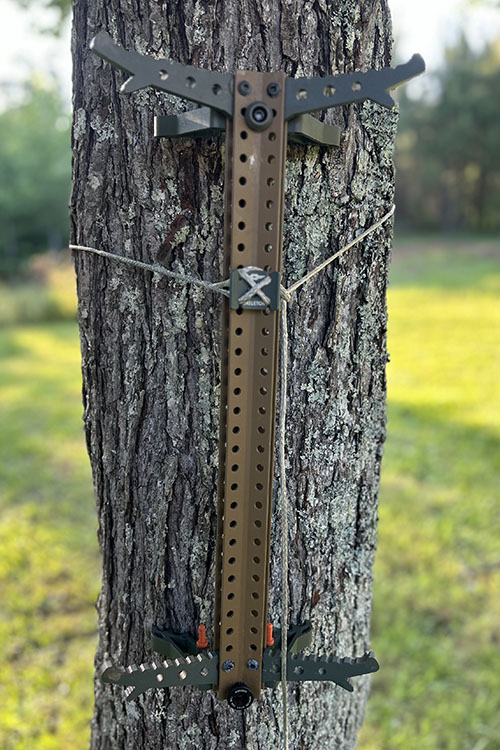
Specs:
Length: 20 inches
Weight: 2 pounds including the attachment rope
Weight Limit: 300 lbs
Step Configuration: Dual steps
Sold in a pack of four
What I Like:
- Steps that point away from the tree giving more foot room
- Dynaloc Tab and Dynalight rope attachment method that is extremely quick and quiet
- StickLoc pin system to firmly hold the sticks together during transport
This is one of two Tethrd climbing sticks on our list for saddle hunters. The Tethrd Ones discussed above are what I currently use, and I truly believe they are the best sticks on the market. I’m not aware of any other climbing sticks in existence that weigh less than one pound each. However, they are also pretty pricey at over $300 for a pack of three.
Realizing that the Tethrd Ones are out of the price range of many saddle hunters, Tethrd went back to the drawing board and came back with their new Tethrd Skeletors. The Skeletors share a lot of the same features as the Tethrd One sticks, but at a much lower price point.
In fact, not only are they cheaper, but you get four of them as opposed to three. So why would anyone choose the Tethrd Ones over the Skeletors? Simple. Each Skeletor stick weighs twice as much as their Tethrd One counterpart. Saving weight comes at a premium when it comes to saddle hunting gear, especially climbing sticks.
Best Budget Option: Muddy Pro Climbing Sticks
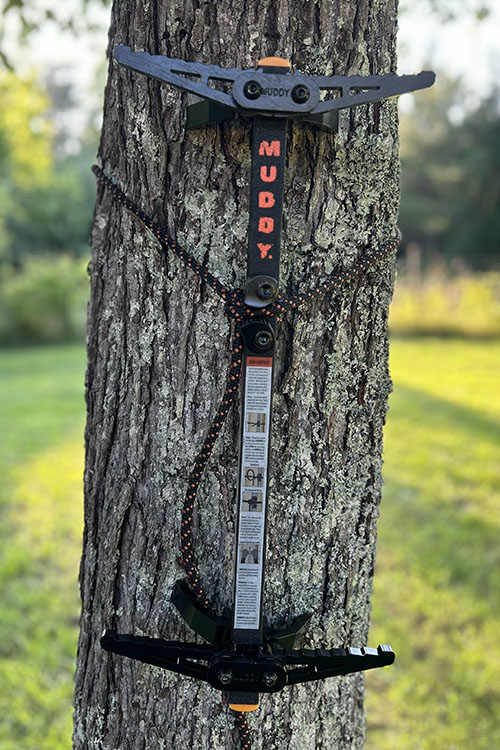
Specs
Length: 20 inches
Weight: 2.5 pounds each
Weight Rating: 300 pounds
Step Configuration: Two sets of double folding steps
Sold in a pack of four
What I Like:
- Unique rope cam system for quick and quiet installation
- Affordable price point
- You get four sticks
The Muddy Pro climbing sticks feature the peg-pack series that allows them to pack together with several of the Muddy hang-on treestands. Of course, that’s not going to be real helpful if you’re using them for saddle hunting!
Regardless, each aluminum stick features built-in teeth for extra grip and a unique rope cam system for a quick and quiet installation. These sticks are the heaviest on the list at 2.5 pounds each, but if you can tolerate the weight, you can’t beat the price point.
Features to Consider
When you think about climbing sticks for saddle hunting, it may seem they’re all basically alike, making it tempting to base your decision on price alone. However, if you do your research, you’ll quickly realize there are actually some major differences among the various options.
Here are the key features we recommend investigating when comparing climbing sticks for saddle hunting that should ultimately help you make your final decision.
Weight
Probably the biggest factor when purchasing gear for saddle hunting is weight. The whole purpose of saddle hunting is to be lightweight and mobile, so you don’t want to be weighed down by a heavy set of climbing sticks.
Just keep in mind that light weight typically comes with a higher price tag as you saw in the products outlined above.
Length
Not only does the length of your climbing sticks impact the overall weight, they also can impact the packability of the sticks as well. Longer sticks strapped horizontally to your pack can be a nightmare hanging on every sapling and vine you pass by, so keep that in mind when deciding what length climbing sticks you ultimately choose.
Climbing stick length also impacts how how high you can climb with those sticks, and ultimately how high you can hang your hunting platform. Obviously, longer sticks with three sets of steps will allow you to climb higher than the same number of shorter sticks with just two sets of steps each.
Weight Limit
This is not going to be an issue for most saddle hunters, but it’s something to keep in mind. Most all of the climbing sticks discussed above have the same 300-pound weight rating with the exception of the XOP sticks which have a 350-pound rating. My guess would be all these figures are pretty conservative, but I wouldn’t recommend exceeding them regardless.
Attachment Method
The way you attache a climbing stick to the tree may seem somewhat trivial, but to me it’s one of the main considerations when buying climbing sticks. You want to be able to attach your sticks to the trick quickly and quietly, and you want them to be secure.
To me, Tethrd has the best attachment method, hands down, with their patented Dynalite rope and tab. Both their One sticks and Skeletors feature this design.
Step Configuration and Spacing
The final feature to consider when choosing the best climbing sticks for saddle hunting is the step configuration and spacing. While having single steps may shave a few pounds of overall weight, it may create issues when climbing or descending the tree.
I prefer dual step models where I’m not limited in which foot I move up or down at any given time. It’s also nice to be able to rest both feet at the same level when hanging your platform or adjusting your lineman’s rope. In my mind, there’s less chance of missing a step as you climb up or down the tree in the dark, too.
For those reasons, I mainly featured double step models in this article, although several of the manufacturers offer single-step models if that’s what you prefer.
Give Us Your Feedback
If you have experience with these or any other climbing sticks, we would love to hear about it in the comments section below.
]]>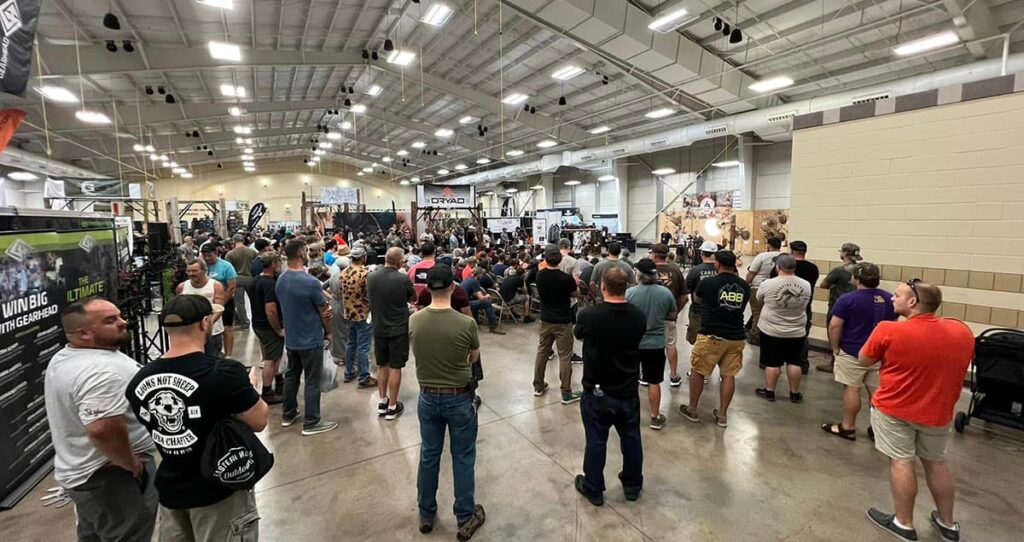
The Mobile Hunters Expo, the nation’s only trade show dedicated to mobile deer hunting, will host three events in 2024:
The Southern Show
Dalton Convention Center
Dalton, Georgia
June 28-30, 2024
The Northern Show
Kalamazoo County Expo Center
Kalamazoo, Michigan
July 26-28, 2024
The Nor’easter
Spooky Nook Sports
Manheim, Pennsylvania
August 9-11, 2024
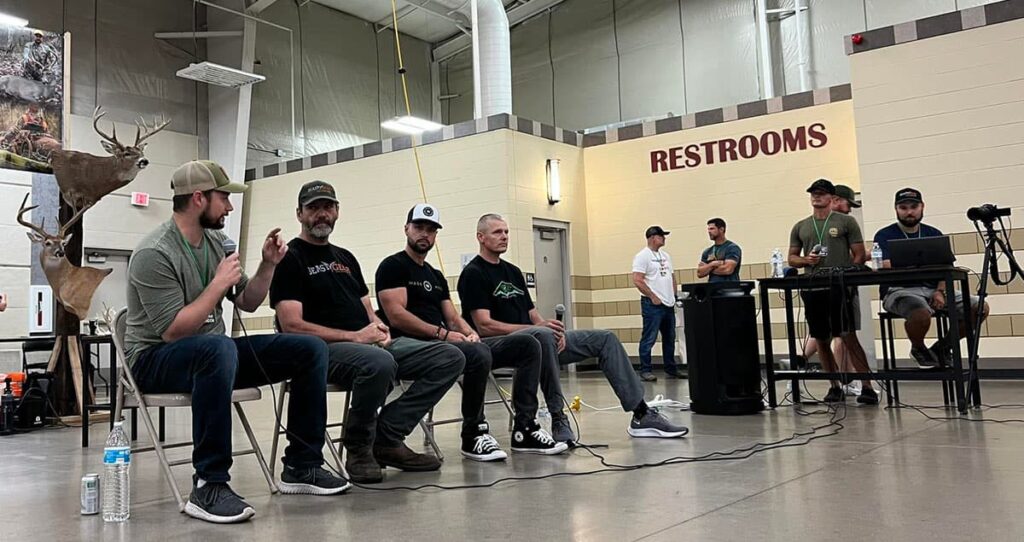
The Mobile Hunters Expo is unlike any other outdoor expo, providing an interactive learning environment where you can try out mobile hunting equipment from the top manufacturers in the industry and learn from the best in the business through informative seminars.
“We wanted a place where like-minded hunters of all levels could gather and exchange stories and knowledge, as well as try gear before they spend their hard earned dollars on it,” said Christopher Leppert, CEO and Founder of the expo.
Attendees can expect to see and test gear from some of the top companies in the mobile deer hunting industry, including Tethrd, XOP, Tactacam, Elevate Stand Co., The Amsteel Guy, and many more.
The Mobile Hunters Expo started with a single small show in Ohio in 2021. In 2023, it expanded to two shows — a southern show in Chattanooga, Tennessee, and a northern show in Kalamazoo, Michigan. This year promises to be the biggest and best year yet, with three great shows and more vendors and seminar speakers than ever before.
Tickets for all three shows are on sale now. Single day passes are $20, or you can get a full weekend pass for $40. Discounts are available for military and first responders.
To learn more, or to get tickets, visit themobilehuntersexpo.com.
]]>A Roomy, Lightweight Platform
A Roomy, Lightweight Platform
Tethrd Predator/Predator XL
The Predator is the OG of modern saddle hunting platforms. It’s a relatively lightweight option (3 lbs or 4 lbs for XL), that when seated properly, is rock solid on the tree.
The sub-$200 price tag makes it a great mid-priced option. Overall, I’ve been extremely happy with the platform.
How We Tested
Aside from three years of hands-on experience using the Tethrd Predator XL for hunting, we made sure to put it through specific testing for the purpose of this article. We tested it on a variety of heavy bark and slick trees of all sizes.
We looked at what it takes to ensure the platform is rock solid on each tree, and how much the stand flexes under normal use. We also tested its quietness and platform grip (do your feet slip on the platform?)
Pros and Cons
PROS
- Lightweight at 3 pounds
(4 pounds for XL) - Ample foot room
- Rock solid when properly seated
- Adjustable leveling in tree
- Good grip on top and sides
CONS
- Unfinished aluminum
- Large metal buckle on strap can make a lot of noise during setup if you’re not super careful.
- No angled edges on the platform for maximum foot comfort
Scoring
Performance
With three full seasons of testing under my belt now, I can say the Tethrd Predator XL has been a great platform. At 4 pounds, it’s not the lightest one on the market, but it provides a great blend of foot room and stability for the weight.
I wear a size 12 and wanted the ability to turn around and stand on the platform to make a weak side shot when needed, so a roomy platform was a must for me. The Predator XL provides that, and the grips on the top and sides of the platform allow you to maneuver around it as needed without slipping.
Another critical factor for any saddle hunting platform is rock-solid stability, and the Predator has that when set up correctly.
When I first started using the platform, I didn’t know how to properly “toe hook” it, so I often hunted with the teeth at the top of the post not firmly against the tree. It still never kicked out on me, but it did have some give like that.
Once I figured out that I needed to strap the platform to the tree, and while it was still folded up, put weight on top of the post to seat the saddle down into position, and then fold the platform down after that, I never had any issues. That left the entire platform post extremely snug against the tree, and locked in tight.
The Predator XL platform is pretty big, so it does have some flex to it when standing on the corners, but it’s not enough to cause any issues or to make me feel unsafe in any way.
At the end of the day, the only two changes I would make to the platform are the incorporation of some type of buckless strap system to avoid the current heavy, noisy buckle. And I would like to see some type of low-sheen finish on the platform as opposed to the shiny, unfinished aluminum.
I can’t say that a deer has ever busted me due to the aluminum finish, but it just doesn’t seem right on hunting gear, and for $199, I don’t feel like you should have to paint it yourself.
Platform Specs
| Predator | Predator XL |
|---|---|
| 12"x13"x3" platform | 13"x16.25"x3.25" platform |
| Weighs 3 pounds | Weighs 4 pounds |
| 300-pound weight rating | 300-pound weight rating |
| $189.99 MSRP | $209.99 MSRP |
Should You Buy the Tethrd Predator?
The Tethrd Predator XL is a great platform for someone who prefers plenty of footroom and rock-solid stability at a decent weight and moderate price point. If you’re more concerned with overall weight than foot room, then you can always opt for the standard Predator model, or go with one of the lighter (and likely more expensive) models on the market.
]]>Not soon enough. But before you know it.
There is no better time than now to start preparing for the upcoming season. In fact, here are five things you can start doing now to tip the odds in your favor come fall.
Scout!
Now is a great time to scout. But then again, there aren’t a lot of BAD times to scout.
The best part about scouting this time of year is the deer have plenty of time to excuse your intrusion before the kickoff of deer season.
This is also a great time because the woods are looking a lot like they will in early bow season. So you can get a good feel for how thick an area truly is and how much trimming you will need to do for good shooting lanes.
Aside from getting your trail-cameras out — which we will discuss in the next section — you can use this time to better learn the lay of the land, check out spots you may have overlooked last season, and even start pinpointing stand locations.
If you are fortunate to live in an agricultural area with plenty of crop fields around, summer is a great time to get in some evening glassing to see what bucks are using the fields and how they are entering and exiting those fields.
Get Those Trail-Cams Out
Don’t wait until season is almost here to put out your trail cameras. Get them out now so you have plenty of time to move them around to pinpoint travel patterns as well as the quality of bucks in the area.
Sure, the bucks are really just getting a good start on growing antlers, but it’s always fun to watch that growth and monitor their development as the season progresses. And once you get on a potential good buck, there’s a good chance he’ll remain in the area until food sources change and hunting pressure ramps up.
Hang Stands and Prep Stand Locations
Why not take advantage of this time of year — before it gets unbearably hot — and start preparing stand locations? That may mean actually hanging some stands, or just picking out stand locations and trimming shooting lanes.
If your stands have been out since last season, then please take this time to carefully inspect all the straps, cables, and chains. If you’re using straps, my recommendation would be to go ahead and replace them.
I know they aren’t cheap, but they’re much cheaper than the cost of a hospital stay or funeral when you fall from a tree.
Again, prepping stand locations this time of year will give the deer plenty of time to settle down from your intrusion, will allow you to go ahead and get your shooting lanes trimmed back, and with that step out of the way, you now have more time to focus on other aspects of the preparation, like shooting your bow!
Shoot Your Bow
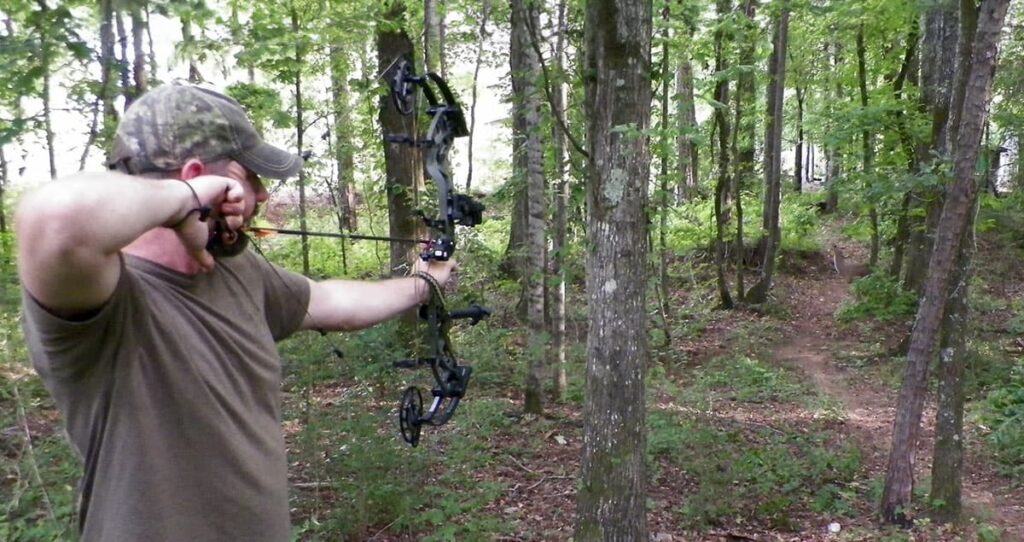
For years I was one of those guys who hung his bow up after deer season and didn’t pick it back up until a few weeks before the next one — which may explain my poor success rate early in my bowhunting career.
Fortunately, several years in, I discovered the fun of shooting 3D archery, and I suddenly had a reason to shoot all year.
If you have never shot 3D archery, I would highly encourage you to give it a try. But even if you don’t, set aside time weekly to shoot your bow during the off season.
You will be amazed at how much more confident you will be with your shooting ability when the season arrives. We owe it to the game we pursue to be as proficient with our equipment as possible to make a quick, humane kill.
Find a New Spot
Are you limited on places to hunt? If so, you are certainly not alone in your struggle. However, summer is a great time to work on that problem.
Network with family, friends, coworkers or anyone who will listen and let them know you’re looking for a new place to hunt. You’d be surprised how often a friend of a friend owns land or has a family that owns land and it’s much easier to gain permission with someone to vouch for you.
Aside from networking, you can go the old fashioned route and knock on doors. You can find potential spots by perusing aerial photos and the private land ownership layer on an app like onX.
Once you’ve located the owner, knock on their door, dressed presentably (not in camo ready to hunt), and ask about hunting the property. This is not the high-percentage tactic that it once was, but it’s a numbers game. If you knock on enough doors, sooner or later you will get a ‘yes.’
Final Thoughts
I don’t want to wish my summer away, but I sure am looking forward to the first sunrise of deer season.
But since we all have to make it through these next few months, we may as well use the time to do everything we can to prepare for a safe, successful deer season.
If you’ll work on these five tasks from now until deer season, you’ll definitely be ahead of the game come opening day. Good luck this season!
]]>But once I finally bought my gear and got started, I realized it didn’t have to be complicated at all. All you really need is some basic equipment and plenty of practice time to get started. Once you learn the ropes (pun intended) and get comfortable in the saddle, then you can look into upgrading or modifying equipment, if you want.
My goal with this guide is to walk you through the basics of what you need to know and buy to get started in as simple terms as possible. If you have any questions after reading this, please don’t hesitate to drop them in the comments below, and I’ll do my best to answer them.
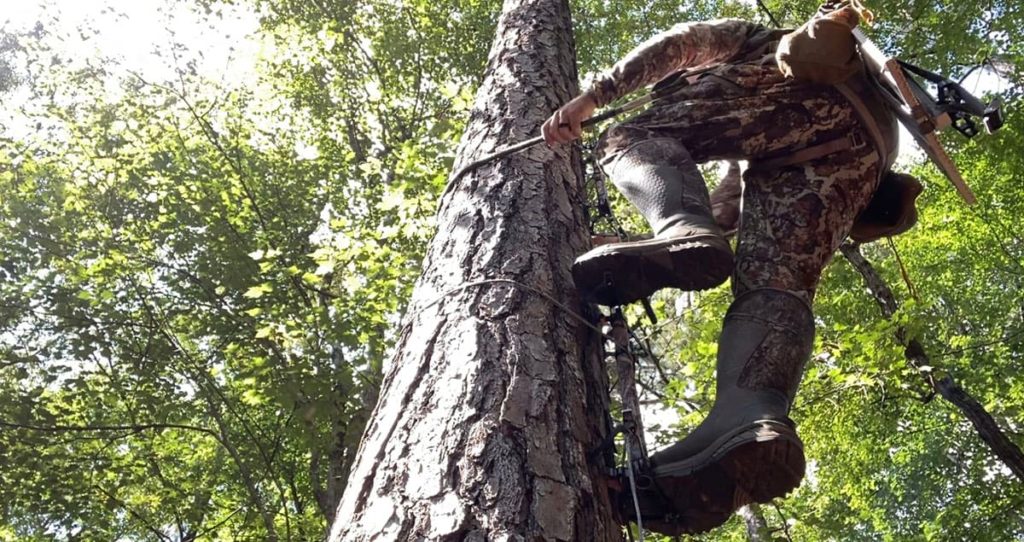
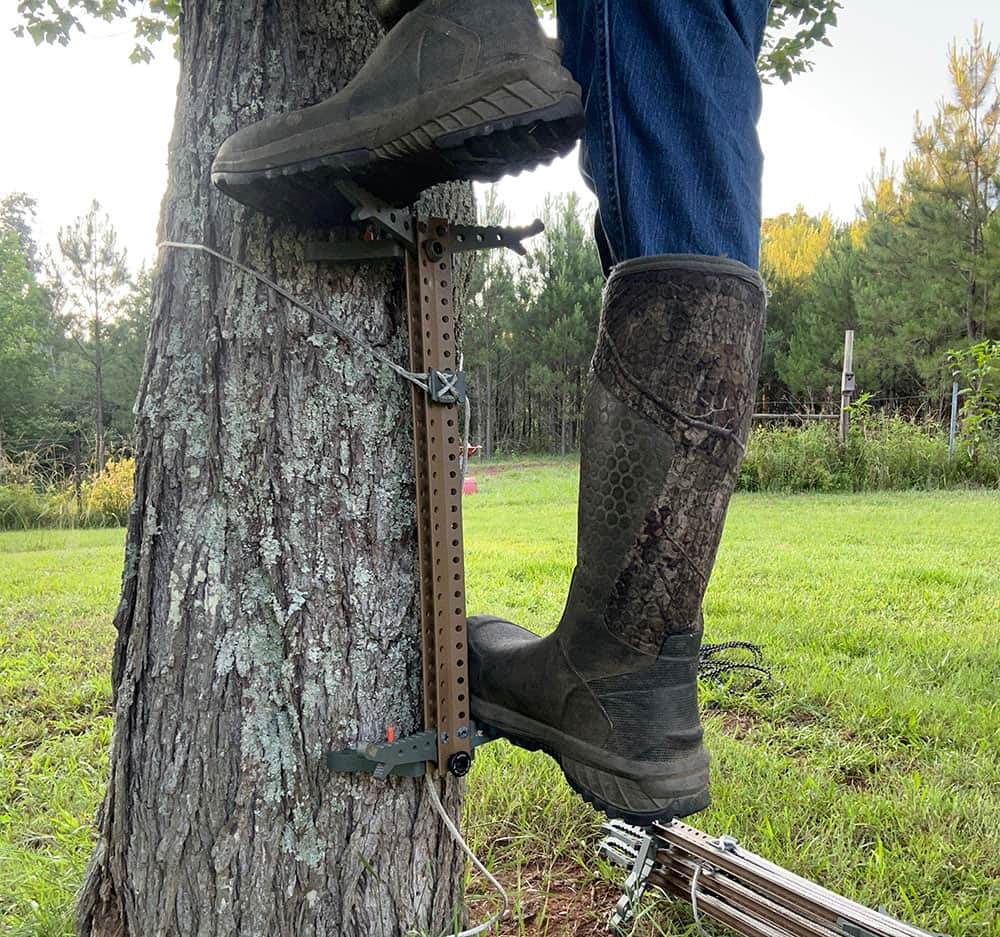
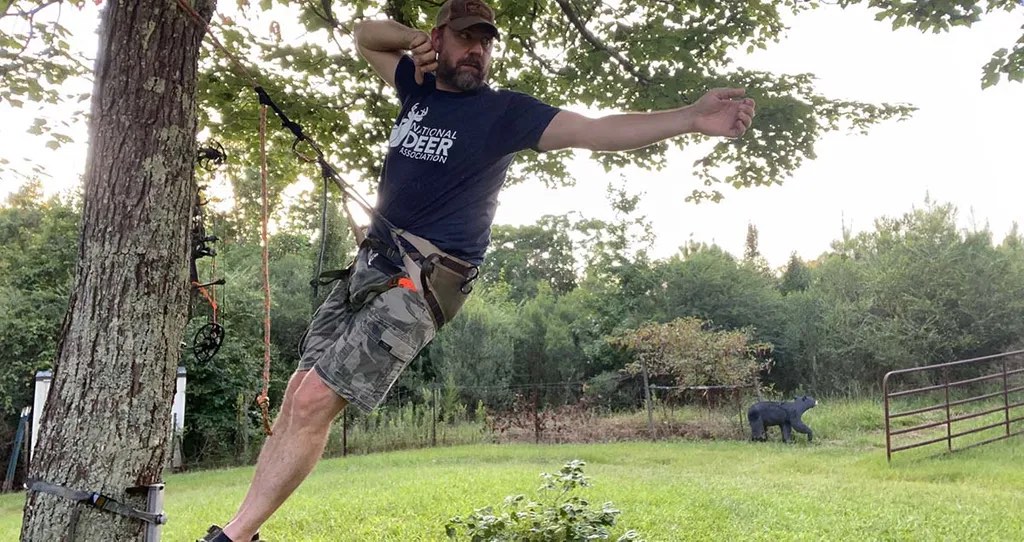
What is Saddle Hunting?
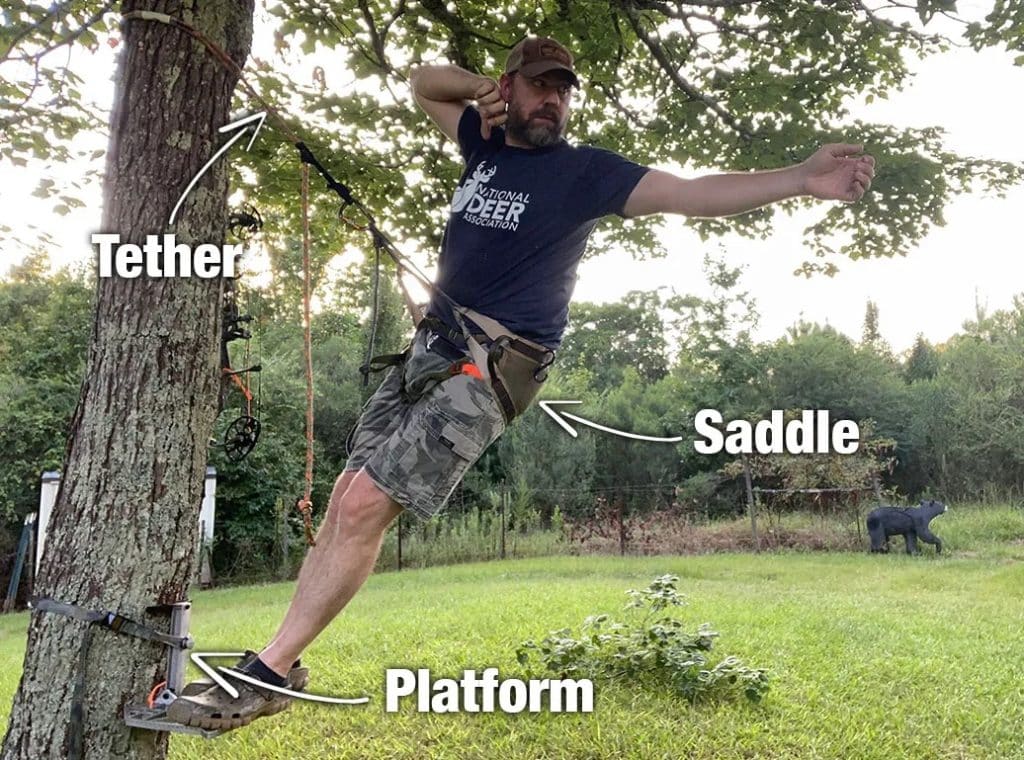
Saddle hunting is a method of elevated hunting that involves wearing a tree saddle or harness that is tethered to a tree with ropes. The hunter typically rests their feet on a small platform or ring of steps and leans away from the tree, with their weight supported by the tether rope.
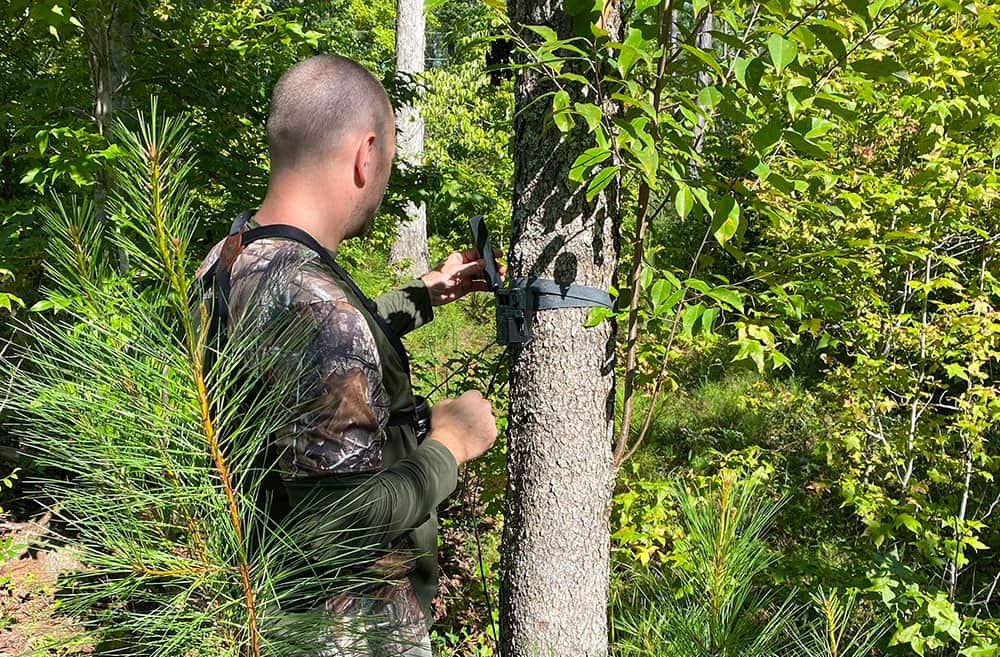
If that sounds confusing, I included the photo above to help you get a visual.
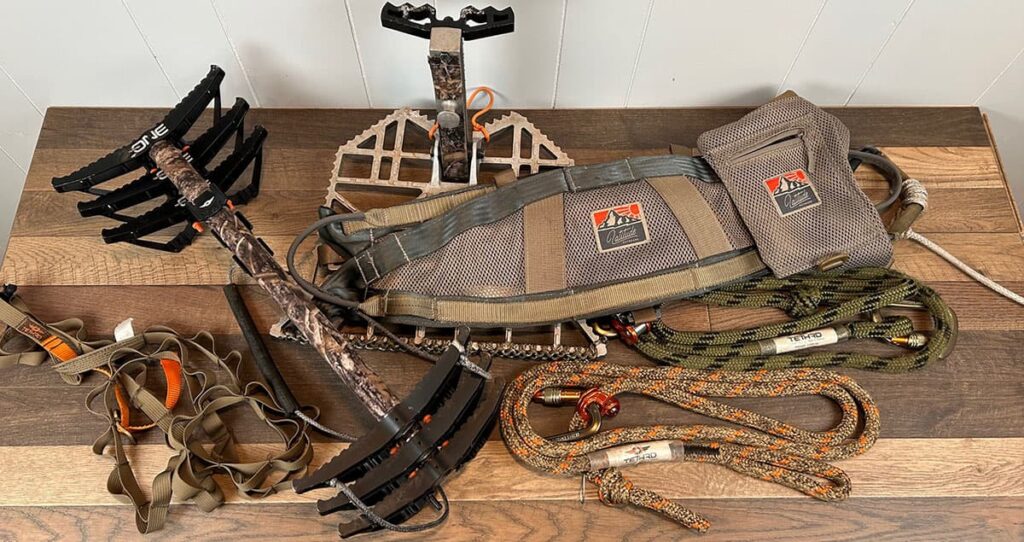
Saddle Hunting Necessities
One of the biggest roadblocks I ran into when I started saddle hunting over three years ago was figuring out exactly what equipment I needed, and what I didn’t. There are lots of different products on the market, and lots of guys modifying their equipment to best suit their hunting style.
What I finally realized after a lot of research was I really only needed three pieces of saddle hunting gear to get started. I realize the video thumbnail above says five, but if you buy a hunting saddle kit, the ropes will come with it.
Equipment Needed to Saddle Hunt
- A hunting saddle kit
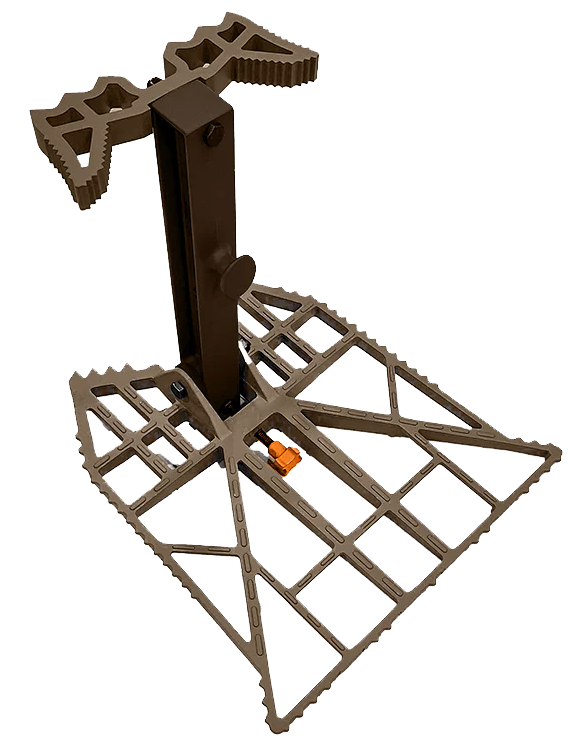
- A platform or ring of steps
- Climbing sticks
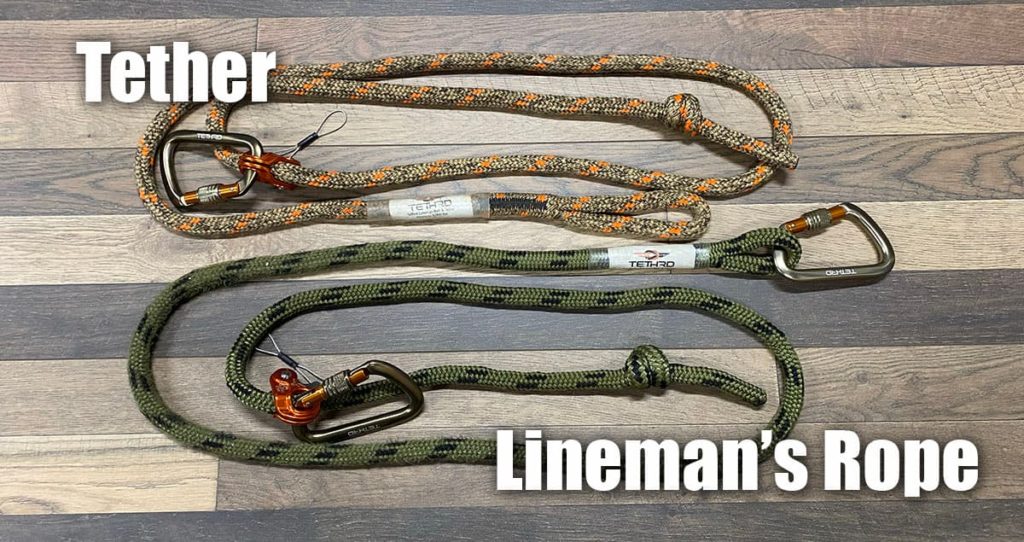
The hunting saddle kit should include your lineman’s and tether ropes and necessary carabiners. I’d recommend going that route rather than buying the items individually to simplify the process.
You’ll then just need a platform to rest your feet on, and some climbing sticks to climb the tree.
Must-Have Accessories
While you can start hunting with just a saddle, lineman’s rope, tether, platform and climbing sticks, there are a few accessories that will make saddle hunting a little easier.
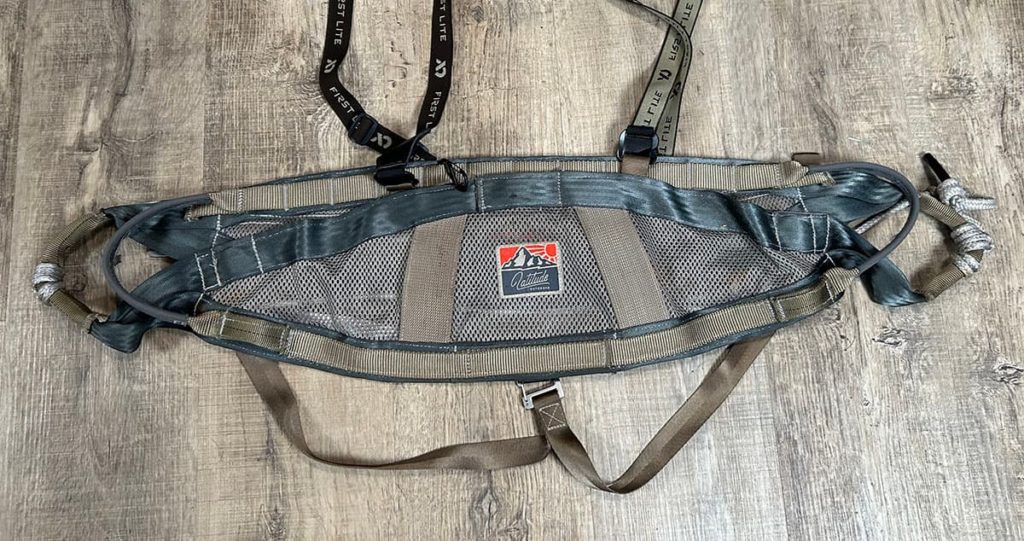
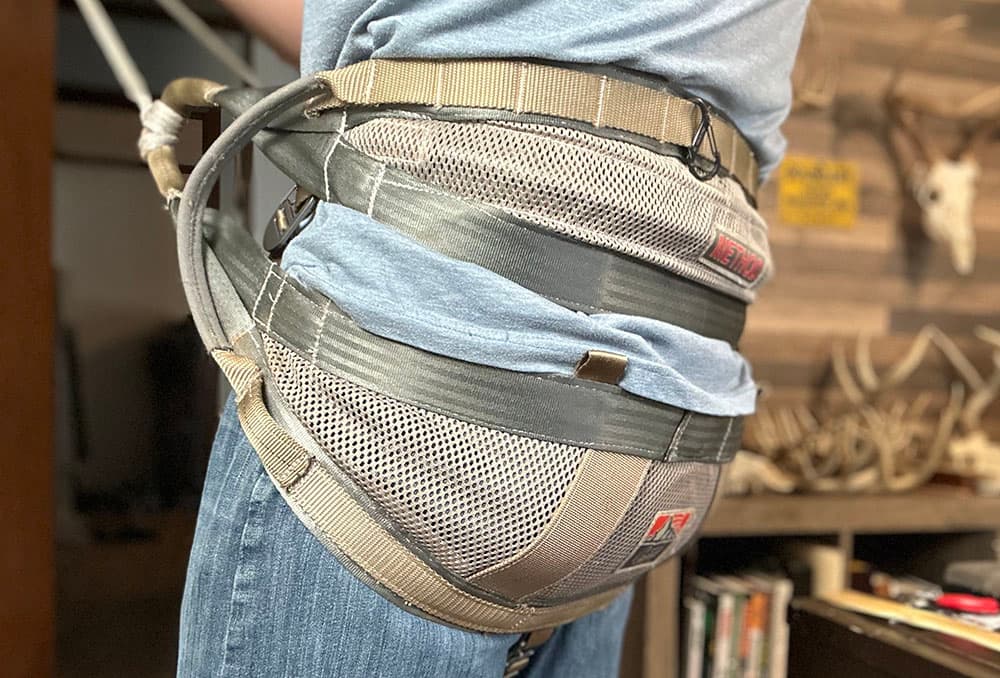
Back Strap or Recliner
This is another accessory that’s worth its weight in gold. The back strap – or recliner – is just a strap that hooks into the carabiner on your bridge and goes around your body up under your arms to support your back as you lean away from the tree. It doesn’t look like much, but it adds a whole new level of comfort to saddle hunting. When a deer comes in, you can lean forward just enough to release the pressure and the recliner should fall down around your waist and out of your way for a shot.
Knee Pads
As I mentioned above, if you’re going to spend time in the sitting position with your knees against the tree, you will want knee pads or a cushion that straps around the tree. I can tell you from experience that it doesn’t take long with your knees digging into the side of a tree to get very uncomfortable.
Accessory Strap/Bow Hook
The last accessory item I recommend is some type of strap and hooks to go around the tree and hold your gear. Tethrd makes a simple one with a series of loops to attach hooks to so you can hang your pack, binos or a rangefinder, grunt call, and even your bow.
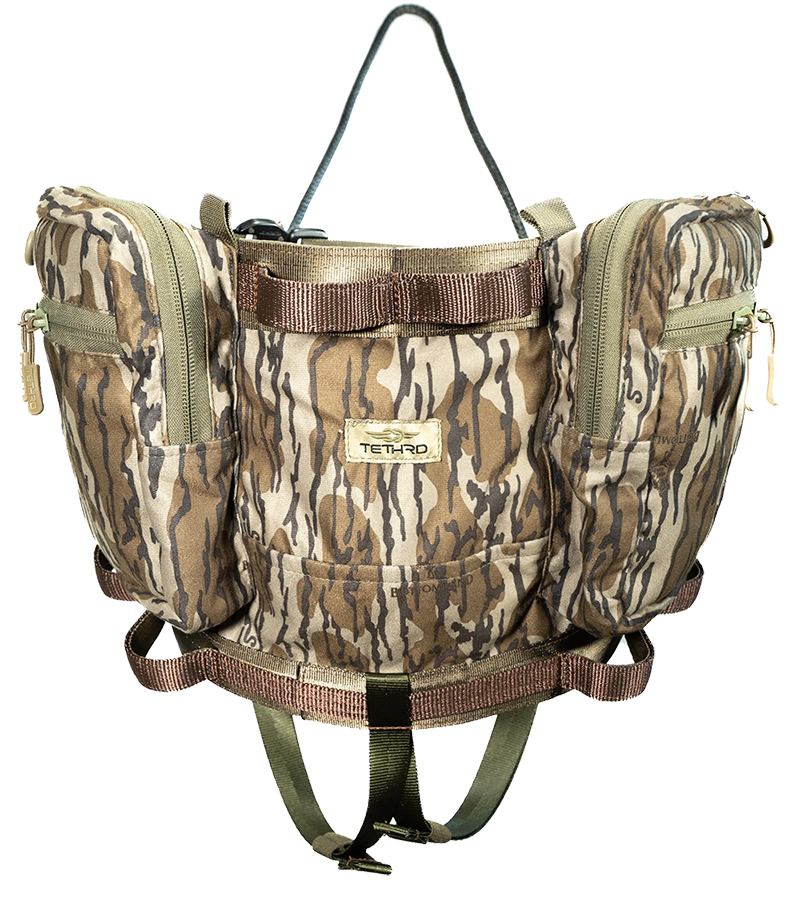
Backpack
And to carry all this gear in the field with you, you’ll want some type of pack. The size and type of pack will depend on what gear your choose and personal preference. Fortunately, with the increasing popularity of saddle hunting, more and more packs are being manufactured with that style of hunting in mind.
Did I miss any important accessories? If you think so, be sure to let me know down in the comments, and I can add to the list!
You Have Your Gear, Now What?
Once you have your gear, you’ll want to spend a lot of time practicing with it before hunting season rolls around. I’d recommend spending the first few practice sessions just above ground level until you get comfortable in the saddle.
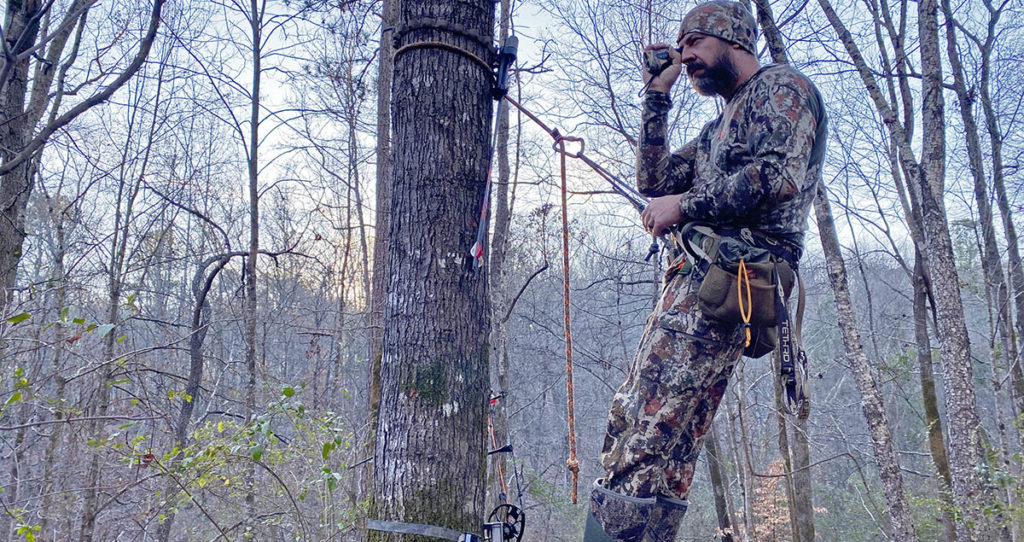
To do so, you can simply strap your platform to a tree a foot or so off the ground. With your saddle on, step up onto the platform, loop your tether rope around the tree about eye level, and attach the carabiner from the loop of the prusic knot on your tether rope to your bridge rope.
You are now tethered to the tree, and should be able to lean back away from the tree while standing on the edge of your platform. You may need to adjust the length of your tether by moving the prusic knot up or down the rope to get an angle that suits you.
This is the perfect time to practice maneuvering around the platform, and getting into shooting position for various potential shot opportunities. As you get more comfortable, you may actually want to incorporate your bow and a target into the practice sessions so you can shoot at various angles.
I can tell you from my experience, it’s going to feel very strange leaning away from that tree and putting your faith in that tether rope the first few times. But once you get used to it, it’s a freeing feeling. I actually feel safer and more free in the saddle than I ever did in a climber or hang-on stand. But it takes some time to get there.
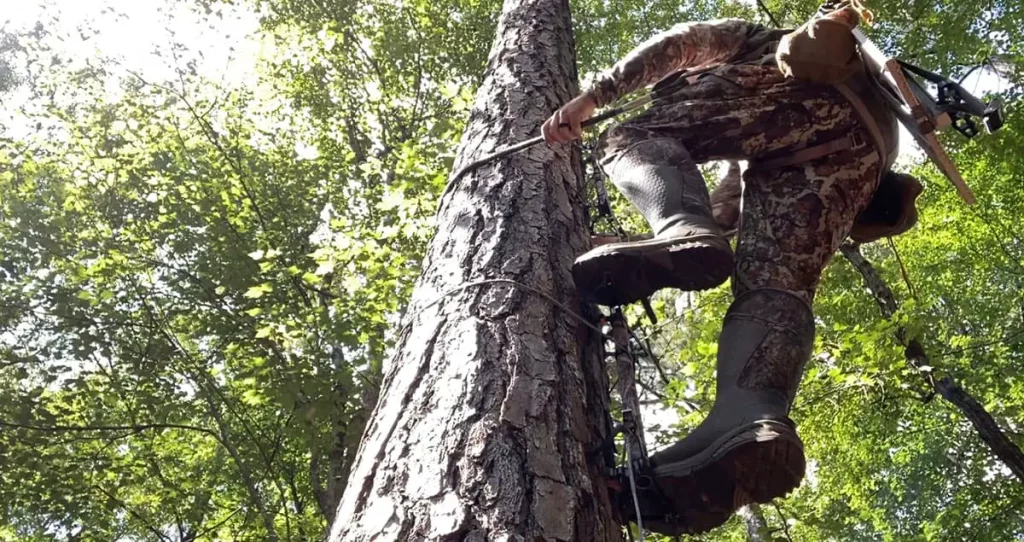
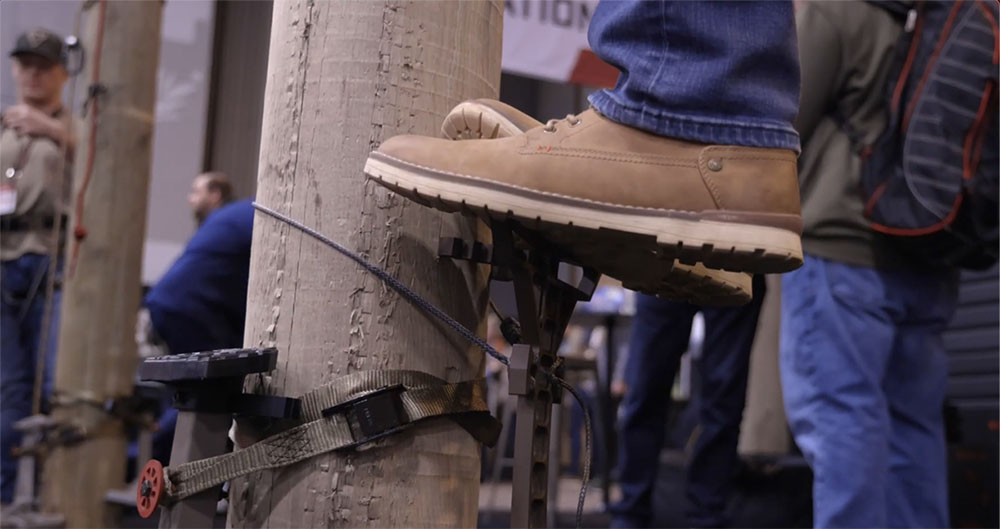
Once you’ve developed that faith in your gear and gotten a feel for the saddle, you can then incorporate climbing the tree with your climbing sticks. That part is pretty self explanatory, but the key is to use your lineman’s rope from the time you leave the ground until you’re hooked into your tether rope at hunting height. Not only will that help keep you safe, but it also frees up your hands to hang each stick as you climb, as well as your platform when you get to hunting height.
Final Thoughts
Saddle hunting is a great way to lighten your load, get more mobile, and put another valuable too into your deer hunting toolbox. No, it’s not for everyone or for every situation, but it has it’s place, and I would recommend every deer hunter at least give it a try.
]]>
The GRIT series was designed to provide saddle hunters with high quality gear at an affordable price point that they can try and buy from local retailers.
“GRIT is a whole new section of saddle hunting equipment focused toward the guys who get their hands dirty,” said Tethrd co-owner Ernie Power. “You’re the guys who are out there making the world work, and you shouldn’t have to be punished by an entry barrier of cost to get into saddle hunting.”
The GRIT series includes three key pieces of saddle hunting gear:
| GRIT Gear | MSRP |
|---|---|
| Workhorse Saddle | $299 |
| Workhorse Platform | $175 regular $185 XL |
| Workhorse Climbing Sticks | $199 |
| TOTAL COST | $673-683 |
Workhorse Saddle
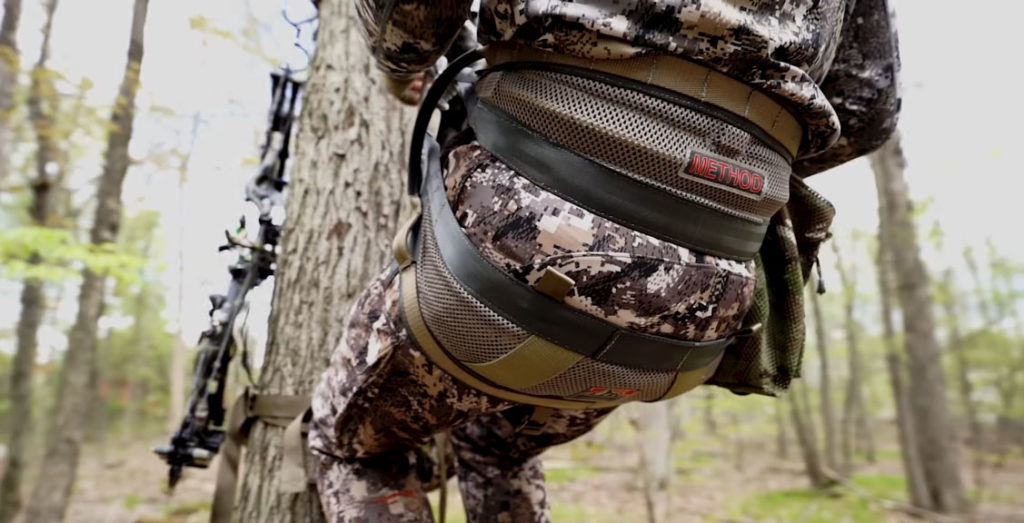
The Workhorse is a great-looking single-panel saddle with no shortage of great features. It’s built with the same quality you’ve come to expect from Tethrd gear. The saddle comes in two sizes — regular and XL — and is available in Mossy Oak Bottomland and Realtree APX.
It comes with built-in pockets on each side, plenty big enough to hold your ropes, rangefinder, archery release, headlamp, or any other hunting gear you may need with you in the tree.
The Workhorse saddle features raptor buckles and a Dynalite bridge, and comes with the necessary tether and lineman’s ropes, carabiners, as well as a back band.
The Workhorse saddle will retail for $299.
Workhorse Platform
The Workhorse platform looks very similar to Tethrd’s extremely popular Predator platform, but with an updated antler bracket. It will be offered in a regular and XL size. Tethrd hasn’t released any size or weight specs yet, but I would expect they will be very similar to the corresponding Predator and Predator XL counterparts. Unlike the Predator, though, preliminary photos seem to indicate the Workhorse platform will come painted or dipped.
The regular Workhorse platform will retail for $175 and the XL $185.
Workhorse Climbing Sticks
While I expect the entire GRIT line will do well, I really think Tethrd is going to sell a pile of their new Workhorse climbing sticks. They remind me of a cross between Tethrd One and XOP’s X2 sticks.
Like the One sticks, they feature Tethrd’s patented Dynalite tab and rope connection method. I believe it’s the lightest, fastest and quietest climbing stick connection system on the market.
The Workhorse sticks have large standoffs that make for plenty of foot room on the dual steps, and they neatly stack using the same StickLoc pin system used on One sticks.
Tethrd has not officially released the weight of these sticks.
The Workhorse climbing sticks have a retail price of $199 for a four-pack.
Final Thoughts
Another unique aspect of the Tethrd GRIT series is that it will only be available through retailers, not directly from Tethrd. This should help build Tethrd’s retailer base, which in turn means better opportunities for would-be saddle hunters to try out gear first-hand before purchasing. It’s a win-win for Tethrd and retailers.
“GRIT is a great way to get started,” said Tethrd co-owner Greg Godfrey. “You can find it in your local retailer, you can test it out in your bow shops, and wherever you buy your gear normally, you can get your GRIT gear there.”
Tethrd has said the GRIT series of gear should be available this summer. There will be more details to come, as far as specific weights and finishes, but it’s already obvious this is going to be a homerun for Tethrd. It’s also going to be a win for new saddle hunters, as they gain access to top-notch gear in a simple, affordable package.
Learn more about Tethrd’s new GRIT gear, including where to get yours, at GritGear.com.
We’d love to hear your thoughts on the new Tethrd GRIT saddle hunting gear over in our Mobile Deer Hunter forums.
]]>I cringe every time I see this, because the avalanche of replies from mostly well-meaning saddle hunters likely leaves the original poster more confused and overwhelmed than when he/she started.
The sheer number of saddle hunting products available these days is enough to make anyone’s head spin, but the best bet for someone new to the game is to keep it simple.
Get the basic setup you need to start, then as you develop a routine and get used to hunting from a saddle, you can then decide things like, what accessories you need and what gear you want to upgrade or modify.
With that in mind, let’s take a look at a few basic setups that will work for a new saddle hunter based on your budget.
Keep in mind, saddle hunting gear is one of those “buy once, cry once” activities where it’s often best to get the highest quality gear you can afford up front to avoid having to upgrade in the near future.
Saddle Hunting Setups Under $500
$500 seems to be the magic number for many would-be saddle hunters. Unfortunately, at that price point, your options are very limited for a full setup of new gear. But it’s not impossible.
If I had to buy a whole new setup tomorrow, and my budget was $500, I would definitely go with the following:
Best Saddle Setup Under $500
XOP Sandlot Kit
(includes Mondo hybrid saddle, ropes and carabiners, and Edge platform)
XOP X2 Climbing Sticks (4)
With a $500 budget, you’d have enough money left over to pick up a few must-have accessories, like a gear strap, back band, and a cheap pack to carry everything in.
A second option at this price point, would be a full Hawk setup. Hawk catches a lot of flack from some more experienced saddle hunters, but the fact is, it gets the job done.
Personally, I think you’re getting a much better platform and climbing sticks with the XOP package. You’re probably getting a better saddle as well, but I have not tested the two to be able to comment first-hand.
If you do decide on Hawk, though, here’s what the breakdown looks like.
Hawk Saddle Setup Under $500
Hawk Helium Hammock Saddle Kit
(includes saddle, ropes and carabiners)
Hawk Helium Climbing Sticks (four 20-inch sticks)
Hawk Helium Platform
Saddle Hunting Setups $500 to $700
If you can afford to spend a little more money, you can really upgrade your saddle and probably get a better platform as well. So let’s take a look at what you can get for between $500 and $700.
You have a couple options in this mid price range. The first being Tethrd’s new GRIT Workhorse series that they recently introduced at the 2024 Archery Trade Association (ATA) show.
The GRIT series is a retail-only product line marketed to new saddle hunters. So you’ll get quality gear from one of the most reputable companies in the saddle hunting space for just under $700.
As I write this in February 2024, the GRIT series is not yet available, but should hit retailers this summer.
Tethrd GRIT Workhorse Saddle Setup
Workhorse Saddle Kit
(includes saddle, ropes and carabiners, and a back band)
~ $300.00
(available July 2024)
Workhorse Climbing Sticks (4)
~ $175.00
(available July 2024)
Workhorse Platform
Under $200.00
(available July 2024)
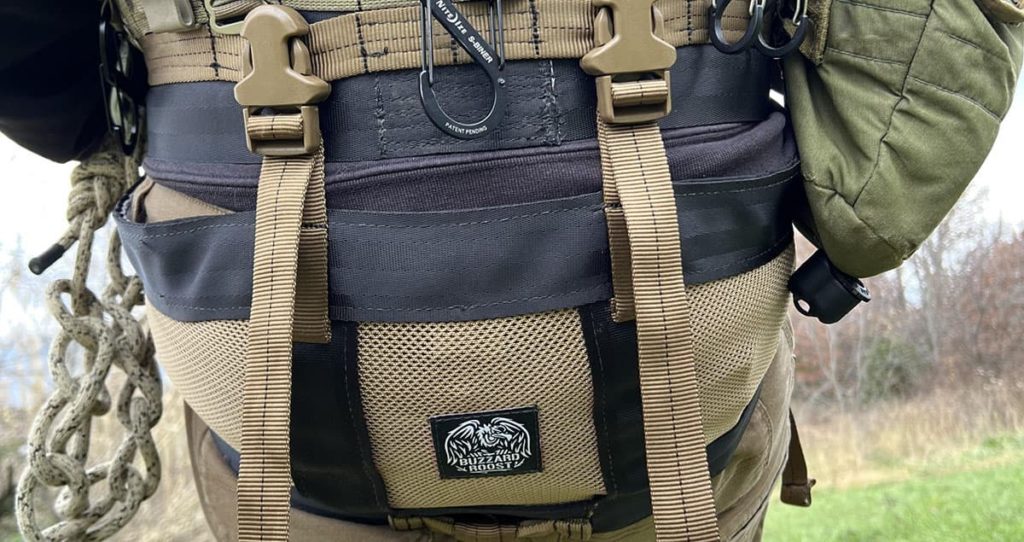
Another option in this price range would be to use the XOP Edge platform and X2 climbing sticks from our under $500 option, but pair them with a better quality saddle kit, like one from Tethrd, CRUZR, Latitude Outdoors, or some of the smaller saddle manufacturers like Buzzard Roost.
Saddle Hunting Setups $700 to $1,000
If you can spend up to $1,000, you have a lot of options available to you. More than I can possibly cover in one article. You should be able to get about any saddle kit you want with any of the popular platforms.
I’d figure $400 for the saddle kit and $200-300 for the platform. At the upper end of this budget, that leaves you $300 to $400 for a good set of climbing sticks.
Here are a couple of options I would consider in this price range:
Best Saddle Setup Under $1,000
Tethrd UltraLock, CRUZR XC or Buzzard Roost Saddle Kit (will include saddle, ropes and carabiners)
~ $450.00
Latitude Carbon SS Climbing Sticks
CRUZR Seeker Platform
The Ultimate Starter Saddle Hunting Setup
If you’re not tied to a budget and can get whatever you want, congratulations! You’ll be able to get the best of the best, and will be somewhere in the $1,200 range for the basic setup.
This would be my go-to setup if I were starting from scratch with a wallet full of cash:
The Ultimate Saddle Setup
Tethrd UltraLock Saddle
Tethrd 8mm Tether and Lineman’s Ropes
with Carabiners
Tethrd One Climbing Sticks
Trophyline Onyx Platform
Note: Trophyline has launched a new HyperLite Series that includes climbing sticks and a platform that are made of a new material call Magnite, that is stronger and lighter than aluminum.
I’m extremely intrigued by the new line, but I’m not going to recommend it here until I’ve personally tested it. If it turns out to be as good as advertised, then I would consider placing the Trophyline platform and sticks on my “Ultimate Saddle Setup” list.
Choosing the Right Saddle
While some platforms and climbing sticks are definitely better than others, ultimately it’s your choice of saddle that will determine your comfort and how much you enjoy saddle hunting.
So choose wisely.
If possible, I would highly recommend trying a few different saddles prior to spending your hard-earned money to ensure you can stay comfortable in it for hours at a time. I think we will slowly start seeing more outdoor stores carry saddle hunting products to try, but until then, find someone local who saddle hunts and test their gear.
Or, if that’s not an option, attend a hunting expo where some of the saddle manufacturers will be, like the Mobile Hunters Expo. That will go a long way in helping you narrow down your options so you start with something that’s going to make saddle hunting an enjoyable experience.
FAQ
Why is saddle hunting gear so expensive?
Saddle hunting gear seems really expensive for what you get. A small platform that barely fits your feet is often more expensive than a nice hang-on stand three times the size. It seems crazy.
But most of these saddle hunting gear manufacturers are small companies producing their products locally in the U.S. And because they are in the U.S. and producing limited quantities, the costs are much higher than treestands mass-produced in China.
As the popularity of saddle hunting continues to grow, and these manufacturers become more efficient, I think you’ll see these prices level out a bit. Not that it will ever be cheap!
Am I better off buying a used saddle hunting setup?
One way to get more bang for your buck when it comes to saddle hunting gear is by buying used. Since most saddle hunters are gear junkies (myself included), we are always trying out new gear and seeking the latest, greatest equipment.
That results in plenty of used gear being available to those just getting into the game. Saddle hunting Facebook groups and forums can be a great place to find used gear. Just make sure you are doing your due diligence when purchasing from a stranger.
The best way is to join a saddle hunting Facebook group for your state, so you can find deals within driving distance. This eliminates the need for the seller to ship and greatly reduces any chance of getting scammed. It also gives you the opportunity to inspect the equipment so you can ensure it hasn’t been damaged or abused.
What if I decide I don’t like saddle hunting?
I’ve ran into very few people who gave saddle hunting a serious try and didn’t like it. But I guess it happens. The good news is there is a very strong market for used saddle hunting equipment.
So, if you do get started and decide it’s not for you, chances are you will be able to sell your equipment without losing too much of your investment. Another option would be to trade it for other hunting gear that interests you.
You can do everything right for the 2-mile hike into that big buck’s bedroom, but one small clang of metal on metal during setup and it’s game over.
As a saddle hunter, you already have an advantage over those using climbers or hang-on stands. The lightweight, minimal gear makes it much easier to set up in silence, but the risk is still there.
With a few inexpensive additions to your gear, and an extra level of caution, you can ensure you stay silent, to help tip the odds of getting in close to your target buck in your favor. Let’s take a look at how to get your saddle hunting gear ready for next deer season.
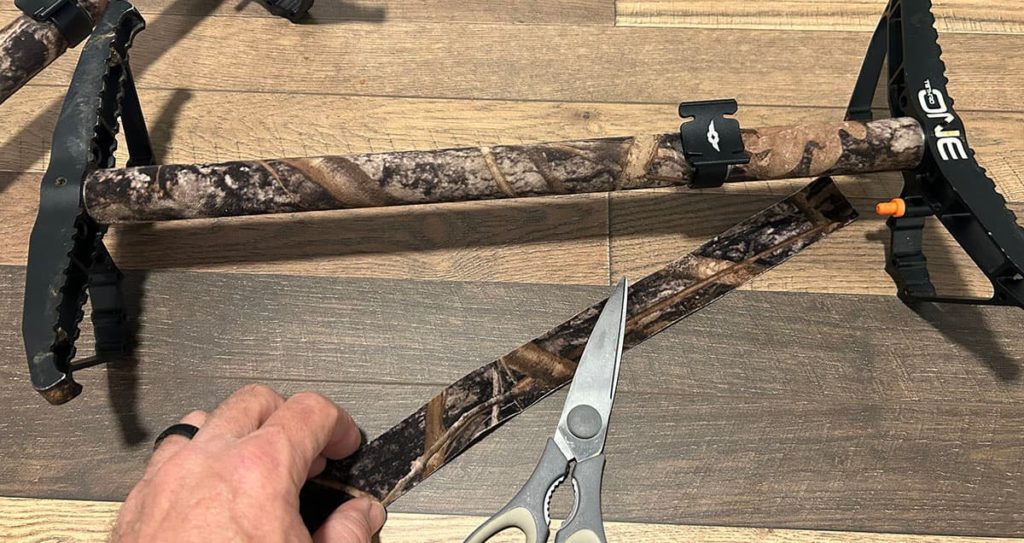
1. Stealth Strips (or Hockey Tape)
The first stip to silencing your saddle hunting gear is to cover as much of the exposed metal as possible with some type of sound deadener. For years, items like cloth tape or hockey tape served this purpose for saddle hunters, but now there is a product on the market specifically for silencing your gear – Stealth Strips.
Stealth Strips is a durable, water resistant, peel-and-stick silencing material used to wrap a variety of hunting gear, including climbing sticks, platforms, carabiners, and about anything metal that may create noise in your setup.
For my gear, I have the tubes of my Tethrd One sticks wrapped, as well as the post on my Predator XL platform. I also wrapped my Muddy camera arm for when I film hunts.
Some guys wrap the edges of their platform in Stealth Strips as well, but I don’t think it would hold up very long to the wear and tear of your boots moving around on the platform. There’s a better option for that, which we’ll discuss below.
If you don’t have access to Stealth Strips or don’t want to spend the money for them, then something more readily available like hockey tape will work just fine. In fact, anything that will help deaden the metallic clang of your gear while holding up to outdoor elements should do the trick.
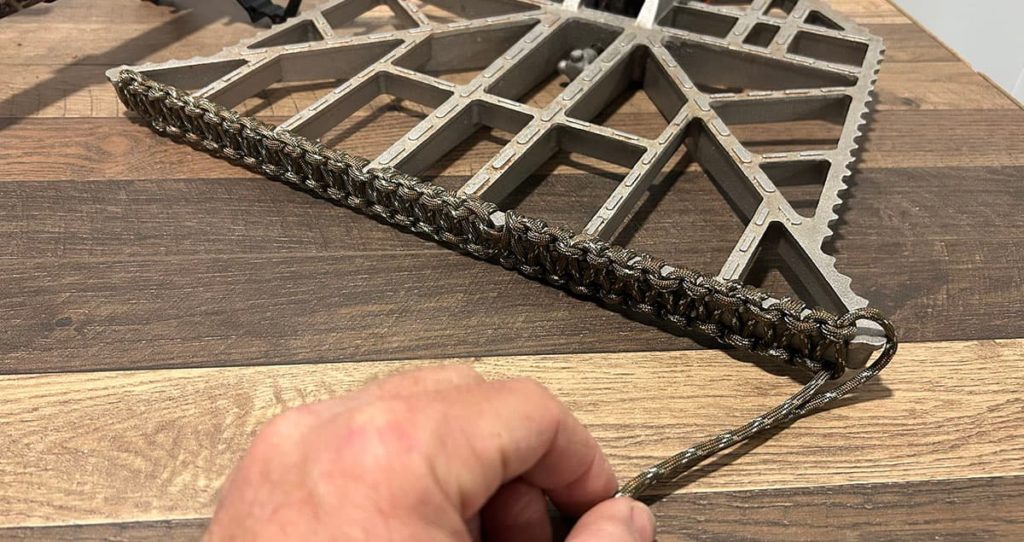
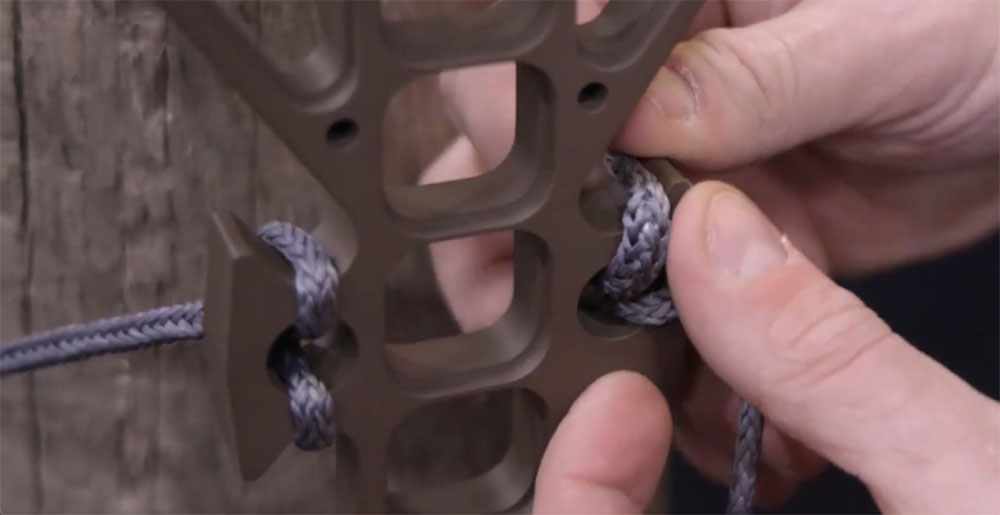
2. Paracord Your Platform
A relatively cheap alternative to wrapping the edge of your platform or the steps of your climbing sticks in Stealth Strips is to wrap them in paracord. This durable nylon cord can be be Cobra-weaved along the edges of your platform and steps to silence them if they come in contact with metal gear.
The paracord can also give you some added traction to an otherwise smooth surface, and some saddle hunters love being able to use the paracord to “feel” the edge of their platform.
If you decide to go this route, my advice is to not get too carried away with the paracord. Only cover areas that are prone to noise or potentially coming in contact with other gear. I say this because while paracord is weather resistant, any fabric like that is going to hold dirt, debris, and human scent. I’ve also heard guys complain about it staying wet for days at a time.
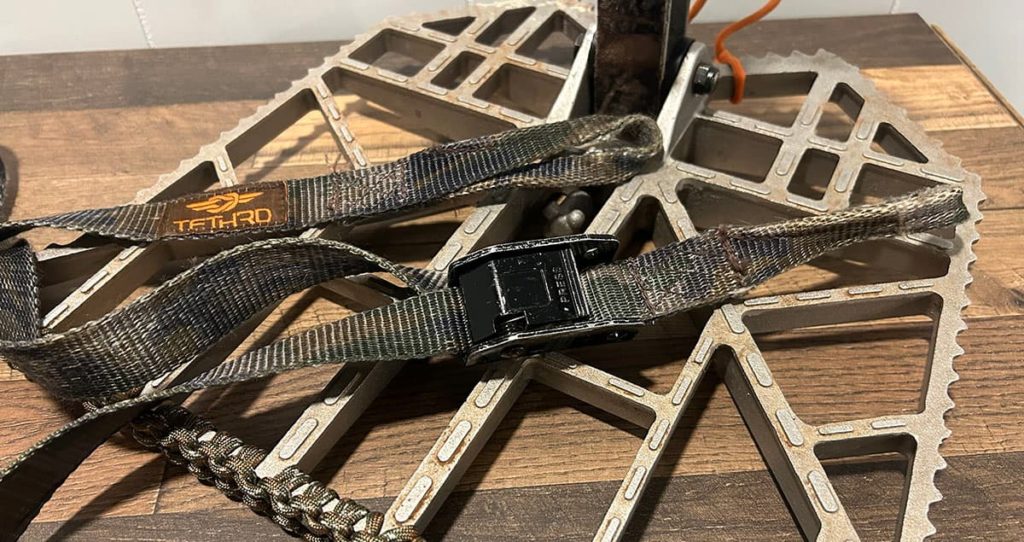
3. Lose the Metal Buckles
In my saddle hunting experience, one of the biggest sources of unwanted noise comes from metal buckles on platforms and climbing sticks. When you’re setting up and swinging those straps around, those buckles seem to always find one of my climbing sticks to bang against.
Of course you can try to cover as much of the buckle as possible in Stealth Strips while still allowing it to function properly. But the noise risk is still there. The other option, and the one that makes the most sense, is to lose the buckles all together and convert your gear to use Amsteel rope or some type of Versastrap to connect to the tree.
One of my favorite things about my Tethrd One sticks, aside from how crazy light they are, is the rope attachment method they use. It is extremely fast, and completely silent. I can’t imagine ever going back to a nylon strap and metal buckle.
So, if any of your saddle gear still has straps with metal buckles, consider swapping the over to eliminate noise and weight!
4. Take Things Slow
Last but certainly not least, the one true key to staying silent is to take your time and be methodical in your saddle hunting setup process.
You can do everything possible to silence your equipment but still slip up, bang something together, and get busted by a cautious buck if you’re not careful.
The best way to ensure your setup is smooth and noise-free, is to allow yourself plenty of time to get into your spot and to get set up. It should never feel rushed.
Slow is smooth, and smooth is fast. And more importantly, smooth is silent!
Having a system for setting up that you stick to every single time helps as well. Develop a routine that works for you and stick with it. Practice it in the off season until it becomes second nature.
If you take your time to do that, you could just about skip the other three steps. Those are more just insurance in case you slip up.
Final Thoughts
Deer hunting success is often found in the details, and one key detail is getting into your spot undetected. Use the tips above to silence your hunting gear, and develop a routine that minimizes the chance of making a mistake. If you do all that, you’ll be one step closer to putting your tag on that buck you’ve been after all season!
]]>This Montana-based company is aimed at bringing premium quality optics to the masses through their direct-to-consumer model. Their C1 binocular series packs impressive features and components rarely found at this price range.
In this in-depth review, we’ll cover the full Maven C1 lineup including the 8×42, 10×42, and 12×42 models. Read on to see how these budget-friendly binoculars stack up when put to the test.
Possibly the Best Hunting Binos Under $500
Maven C1 Series
I got my Maven C1 binoculars about four years ago, and that’s when I fully understood what a good pair of binoculars should look like, and what kind of view they should produce. If you’re looking for great hunting optics with lots of high-end features at a price point well under $500, then I would highly recommend the Maven C1 Series.
Maven C1 Binoculars Lineup
The Maven C1 binocular line includes three different magnification models while sharing many of the same components and features. Available in 8×42, 10×42, and 12×42 configurations, the primary differences between them comes down to magnification power and field of view width.
This allows the user to choose the model best suited to their specific needs and preferences:
- 8×42: Ideal for hunting primarily wooded areas east of the Mississippi River. Offers a nice balanced magnification with a wide field of view – 377ft @ 1000 yards. Easy to hold steady while handholding.
- 10×42: Provides more magnification for observing detail while maintaining a reasonably wide FOV of 314ft @ 1000 yards. Useful for viewing deer and other big game at a distance while still allowing easier scanning than a 12x model.
- 12×42: Maximum magnification of the C1 line. Ideal for observing distant objects in fine detail with its 264ft @ 1000 yard FOV. Harder to keep steady at high zoom but useful for focusing on objects far away.
All models share many of the same features:
- Extra-low dispersion (ED) glass elements for reduced chromatic aberration
- Highly reflective phase-corrected roof prisms with dielectric mirror coatings
- Open bridge body design crafted from lightweight magnesium alloy
- Waterproof and fogproof – nitrogen purged and o-ring sealed
- Twist-up eyecups for use with or without eyeglasses
- Large smooth focus knobs usable with gloves
- Tripod adaptable to mount on a tripod or car window mount
- Close focus distance of 6.5 feet across all models
- Weighs 21-24oz depending on configuration
- Backed by Maven’s lifetime warranty
PROS
- Quality construction
- Great clarity and contrast
- Lightweight polymer frame
- Multi-coated lenses
- Direct to consumer sales
- Unconditional lifetime warranty
CONS
- Slightly narrower field of view compared to similar models
- Doesn’t come with a hard case
Our Ratings
Optics and Image Quality
It’s in the optics department where Maven really shines in relation to competitors at this price point. Rather than settle for lesser components, Maven outfitted the C1 models with top-shelf HD glass elements.
They utilize extra-low dispersion (ED) glass which reduces color fringing and chromatic aberration. Images appear sharp and color-accurate across the entire field of view.
The phase-corrected roof prisms feature high-reflectivity dielectric mirror coatings. This maximizes light transmission and brightness for a clear, high-contrast image even in low light conditions like dawn and dusk.
Fully multi-coated lenses increase light transmission across the entire visual spectrum resulting in brighter images with true color rendition.
Together these components enable exceptional optical performance not normally found at this price range. Image quality remains crisp and clear across the whole field of view with very little edge distortion on any model.
Fine details like feather patterns are razor sharp while color reproduction is vivid and accurate. Text remains readable even at long distances.
The light transmission and contrast are equally impressive in a variety of lighting conditions from overcast to full sun. Only at the higher 12x magnification does image quality drop off a bit around the edges but for a binocular under $500, the optics are simply superb.
Color and Clarity
Thanks to the ED glass and quality prisms, the C1 binoculars deliver impressive clarity and color accuracy. Images appear sharp and crisp across the entire field of view regardless of lighting conditions or magnification level. Fine details really stand out thanks to the high resolution.
Color reproduction is true to life with vivid hues and tones. There is very little color fringing visible even around high contrast edges. The dielectric mirror coatings on the prisms maximize light transmission for bright, high-contrast views in all conditions. The image remains clear and focused from edge to edge with minimal distortion.
In terms of both color and clarity, the Maven C1 binoculars perform at a level typically seen in more expensive binos. The HD glass elements and phase-corrected prism design allow these affordable binoculars to compete optically with costlier offerings.
Design and Ergonomics
In addition to the high-end optics, Maven designed the C1 models with handling and usability in mind. The open-bridge body design shifts the focus wheel up the barrel allowing for a secure grip. Durable textured rubber armor along the barrels enhances traction while providing protection from bumps and small drops.
Weighing in at 21-24 ounces depending on magnification, the C1 binoculars are reasonably lightweight and well-balanced. The exposed barrels allow you to easily grip and maneuver the binos with one hand. At just 4.25 inches wide, they are compact enough for smaller hands to hold comfortably.
Ergonomic details like the raised focus wheel and grooved eyecups make the binos easy and comfortable to use even on full days of birding or hunting. The generous 6.5 foot close focus distance on all models enables viewing subjects up close.
Other key features help round out the handling and usability:
- Twist-up eyecups lock in the up position for eyeglass wearers or twist down for those without glasses.
- The diopter adjustment ring allows you to fine tune each barrel to your eyes for optimized image sharpness.
- Large textured focus knobs provide an ergonomic grip and turn smoothly without feeling stiff or gritty.
- Tripod adaptable for mounting the binoculars on a tripod or car mount for enhanced stability.
- Waterproof and fogproof for reliable performance in wet conditions.
Overall, Maven designed the C1 binoculars with real-world use in mind. The comfortable ergonomics and handling make them a pleasure to use for extended periods.
Performance and Image Stabilization
With quality optics and components, the C1 binoculars perform admirably in real-world conditions. The ED glass and phase-corrected prisms maintain crisp, aberration-free images across the field of view even in low light. Contrast and clarity hold up nicely in harsh sunlight as well.
The comfortable ergonomic design allows you to glass for hours without hand strain. The textured armor provides a secure grip to help keep the binos steady when scanning or viewing active subjects. The close 6.5 foot minimum focus distance lets you view insects, plants or animals up close.
The 10x and 8x models are reasonably easy to hold steady enough to keep your subject framed and focused. The 12x magnification demands a very steady hold or tripod mounting to avoid too much shake when handholding. The wider field of view on the 8×42 model makes it easier to locate and track moving targets like birds in flight.
Actual performance aligns with what you would expect from quality binoculars in this price tier. While not quite as robust as high-end offerings, the C1 provides very good optics and handling at a more budget-friendly level.
Durability
Maven built the C1 binocular line to perform reliably in tough outdoor environments. The polycarbonate chassis and magnesium alloy frame make them reasonably durable while keeping weight down.
Nitrogen purging and tight o-ring seals make them waterproof and fogproof. Textured rubber armoring helps protect the body and barrels from small drops and bumps.
The ED glass elements feature ion-assist lens coatings for enhanced abrasion resistance and durability. While the C1 binos aren’t built quite as robustly as top-tier offerings, they can certainly handle some rough treatment in the field while providing seasons of quality service.
Overall durability meets expectations for the price point.
Accessories
Maven includes a few useful accessories with the C1 binoculars:
- Padded nylon neck strap
- Mesh carry bag
- Rain guard
- Objective lens caps
- Eyepiece caps
- Cleaning cloth
The neck strap and carry case provide secure storage when traveling. The rain guard helps shield the ocular lenses from precipitation when glassing in wet conditions.
Optional accessories like scope and harness straps are also available from Maven for added carrying convenience.
Overview of Maven Optics
Founded in 2016 by a group of avid outdoorsmen, Maven built their reputation on high-performance optics offered at competitive prices. By selling directly to consumers online, they are able to cut out additional costs and retail markups.
The savings get passed on to the customer in the form of advanced features and components typically found on pricier models. Maven’s optics are designed, engineered, and rigorously field tested in the mountains of Montana.
Their products cover the gamut from spotting scopes and binoculars to rangefinders and tripods. The C1 binocular series epitomizes Maven’s commitment to delivering quality and performance at an affordable price point.
Backed by Maven’s lifetime warranty (more on that below), the C1 binos are crafted to last a lifetime while making premium optics attainable for the average user.
Maven Lifetime Warranty
Maven binoculars have one of the best warranties in the business — an unconditional lifetime warranty. In their own words on Maven’s website:
If your optic becomes damaged or is at all defective (not including deliberate or cosmetic damage that does not hinder product performance), contact us immediately for repair or replacement. We don’t care where or when you bought it or if it was your fault or not – if it says Maven, we will take care of it.
– Maven Optics
I can attest to the excellent warranty and customer service first hand. A few years back, I let one of the eye cups on my Mavens get loose during a late winter scouting session, and it came off somewhere in the woods.
I didn’t realize it until I got back to the truck, and wasn’t about to backtrack to try to find it. I reached out to Maven to inquire about buying a replacement, because it wasn’t their fault I lost mine. They immediately shipped me out a free replacement, no questions asked.
Good customer service and companies that stand behind their products are getting harder to find these days, so I can assure you that’s one thing you won’t have to worry about with Maven.
The Verdict
For hunters, birdwatchers, and casual users wanting quality optics at a reasonable price point, the Maven C1 binoculars are a superb value. They offer impressive components and optics at a price that more budget-minded outdoor enthusiasts can realistically afford.
While not built quite as ruggedly as premium brands, the C1 models still deliver excellent performance and usability for the money. If you want an affordable viewing solution without sacrificing clarity and quality, the Maven C1 binoculars deliver performance and value in a compelling package.
]]>Now, just to be clear, I wasn’t having any issues with my single-panel Tethrd Phantom. Like lots of saddle hunters, I just suffered from FOMO and wanted to try something different.
And while this article is not a comparison of the two saddles, I’ll share some thoughts at the end of which I ultimately preferred and what direction I may go from here.
But for now, let’s get to the review!
Quick Look
For those of you who just want the bottom line, the Latitude Method 2 is a great two-panel saddle that is well-designed and very comfortable once you figure out what panel positions work best for you.
While I wouldn’t go as far as saying it’s the best two-panel saddle on the market, I wouldn’t hesitate to recommend it to anyone considering purchasing one.
If you’re still trying to decide if you’d prefer a single-panel vs. a two-panel saddle, we have a great article on our site covering that topic, so we’ll skip that debate for this one.
Quality and Design
Right away, I was impressed with the overall quality and design of the Latitude. The stitching and craftsmanship were excellent, and it had some pretty ingenious features that really stood out to me, including:
Overlapping Panels
The relatively small, individual panels of the Method 2 overlap with each other, allowing you to use it like a small single-panel saddle.
While I rarely wore it that way in the tree, it’s nice for the walks into your hunting spots. It has such a small footprint on your backside, that you hardly notice it’s there.
Built-in Magnets
The saddle has six small, but strong magnets sewn into the panels of the saddle — two in the middle, and two on each side — that hold the panels together when they’re overlapped.
This eliminates the issue of the lower panel dropping down while you’re walking in or out, or while climbing up or down the tree.

Rope Waist Belt
Instead of your standard metal cobra-style buckles on the waist belt, the Method 2 uses an Oplux rope waist belt with a friction hitch. I wasn’t sure if I was going to like this feature, but I definitely did once I got used to using it.
First, it eliminates any noise concerns that come with a big metal buckle. And secondly, it’s super easy to adjust the belt as needed. I’m honestly surprised more hunting saddle companies haven’t moved to a similar setup.
Breathable Mesh Construction
Nothing groundbreaking here, but as a southern deer hunter who often has to endure hot weather during the early season, the breathable mesh construction is nice.
It’s a durable mesh material that not only breathes, but seems to hold up to the elements and is easy to clean if needed.
Girth Hitched Bridge Loops
These are pretty common on most saddles today, but coming from the Tethrd Phanton with the Comfort Channels on the bridge loops, I found I preferred the more solid girth-hitched bridge setup.
You can still adjust panel pressure by moving where the hitches connect to the bridge loops, but once you have them where you want them, they are locked in.
Removable Leg Straps
The Method 2 is often referred to as being “metal free”, but it’s really not. While there is no big metal belt buckle to contend with, the leg straps to have metal clips on them.
Not a big deal, but it’s worth noting, because those metal clips can still make plenty of noise when they hit your platform or climbing sticks.
The good news is that the leg straps are easily removable for the walk in and out of the woods. Some guys forgo leg straps all together, but I’m not one of them.
Before I start climbing the tree, the leg straps go on, and they stay on until I get back down.
I don’t tighten them tight enough to cause discomfort, but if I were to take a fall, I want something there to keep me from completely coming out of the saddle.

Method 2 Specs
For those of you looking for all the technical information on the Method 2, the specs are as follows:
- Type: Two-panel
- Weight: 1 pound 13 ounces with the leg straps attached (actual weight as tested)
- Capacity: 300 pounds
- Sizes: Regular (up to 37” waist) and XL (37” and up waist)
- MSRP: $299.99
- Made in the U.S.A.
Performance in the Field
I just finished up my first full season in the Method 2, so I had lots of time to get a feel for how it performs and what I liked and didn’t like about it.
What I Like
Overall, I enjoyed using the Method 2. It was my first two-panel hunting saddle, and it definitely provided a level of comfort well beyond my previous single-panel saddle. Spending long hours in the tree was not an issue.
But it did take a few hunts to find my sweet spots and get the saddle dialed in!
As I mentioned earlier, I also really liked the metal-free rope waist belt, and the overlapping panels with Quick Connect magnets for a streamlined fit when walking to and from my hunting spot. It doesn’t feel bulky or cumbersome to wear on the walk in or out.
What I Don’t Like
While the Method 2 was a great saddle overall, there was a couple things I didn’t care for. The primary issue being the increased “fiddle factor” of a two-panel saddle. This isn’t a knock on Latitude, but just a factor of two-panel saddle design.
I feel like I was moving more, adjusting the panels where I needed them, which made me more prone to getting busted by an approaching deer.
That issue was compounded by the fact that when I’d stand up from a sitting position, or anytime I took the tension off the tether rope, the bottom panel of the saddle would fall down to the back of my legs.
This was sometimes an issue when climbing up and down the tree, especially if I had any gear (climbing stick or my tether rope) attached to my lineman’s loops. To fix the problem, I would often wear suspenders with the saddle. It helped.
Some two-panel saddles, like the Buzzard Roost, have adjustable straps that tie the two panels together to eliminate the issue of the bottom panel falling down and having to readjust all the time.
I definitely think the Method 2 could benefit from such a feature, although it would likely add a little more weight to the setup.
Final Thoughts
At the end of the day, I’m still not sure if I’m a single-panel or two-panel hunting saddle guy. I loved the added comfort, but I’m not sure it was enough to overcome the extra movement I experienced.
I still want to try the Buzzard Roost two-panel saddle, as well as a single-panel pleated saddle like the CRUZR XC or Tethrd UltraLock (formerly the Tethrd Lockdown), to see if I can find the comfort and simplicity I’m ultimately looking for.
You know us saddle hunters. We’re never completely satisfied with our gear, and even if we are, we still want to try something different!
About Latitude Outdoors
Latitude Outdoors was founded in 2019 by Kevin Leach, Alex Chopp, and Jake Matelic. Leach had taken up deer hunting, and came across his dad’s old hunting saddle in the basement of their home.
He immediately started working on innovative updates to the saddle, and 100+ prototypes later, Latitude Outdoors was born with The Method saddle as its flagship product.
They have been producing great, innovative products ever since, and have quickly become one of the biggest names in the saddle hunting industry.
CONTACT
Latitude Outdoors
1564 Walker Ave NW
Grand Rapids, MI 49504
Email Latitude
In this article, we take a look at a few of the top new innovative products introduced there that promise to enhance your saddle hunting experience. If you see any we missed, be sure to drop us a message in the comments below!
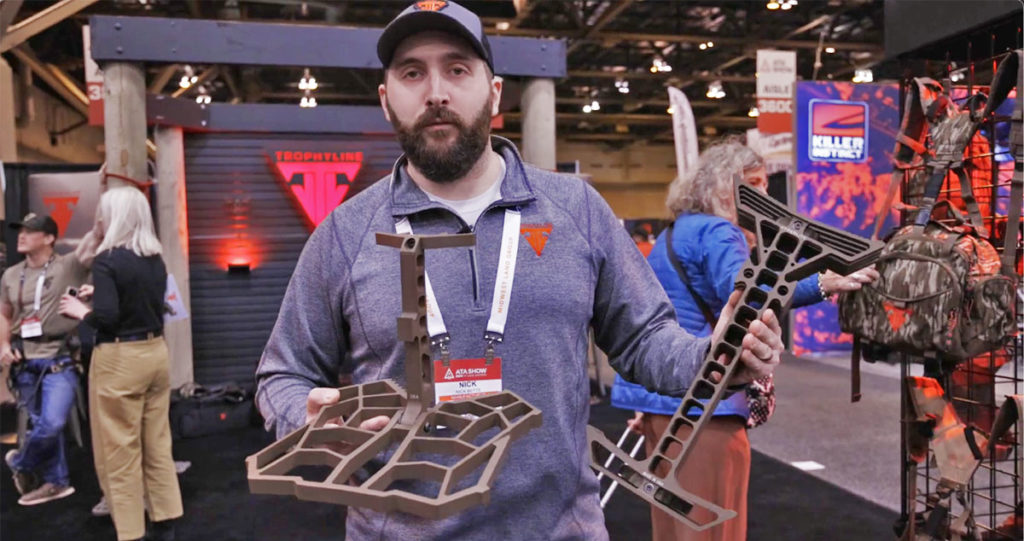
Trophyline HyperLite Gear
Probably the most hyped new saddle hunting gear from the 2024 ATA show was Trophyline’s new HyperLite climbing sticks and platform. Made from a new proprietary Magnite material, the new line promises superior strength with less weight than aluminum or carbon.
The climbing sticks offer a flat-stacking, one-piece design with a quick and easy attachment method and ample foot room at just 17 ounces each. Retail price on the new HyperLite climbing sticks is $449 for a four pack.
The HyperLite platform weighs in around two pounds with a generous 12” x 12” platform that provides plenty of foot room. Retail price on the HyperLite platform is $299.
Tethrd GRIT Series Gear
Not to be outdone, Tethrd created some buzz of their own at the ATA Show with the release of their new GRIT line of products that will be available only through brick-and-mortar retailers.
The line includes Tethrd’s new Workhorse series, which includes a saddle kit, climbing sticks and platform geared towards new saddle hunters looking to give saddle hunting a try without breaking the bank.
Retail pricing on the new Workhorse series will be:
- Workhorse Saddle Kit (with tether, lineman rope and back band) $299
- Workhorse Platform $175 for regular, $185 for XL
- Workhorse Climbing Sticks (4-pack) $199
In addition to their new GRIT line, Tethrd also announced they’ll be offering their premium UltraLock saddle (formerly known as the Lockdown) without the permanently affixed gear bags. That eliminates one of the few complaints we heard about that saddle.
Out on a Limb Mfg
Out on a Limb Mfg, known for their Shikar climbing sticks and minimalist platforms, introduced a couple of new one sticks, including the Plain Jane and the Pinch Point.
As the name implies, the Plain Jane is a bare bones basic one stick. It only comes in a 16-inch length and weighs just over 3 pounds. The top platform is 13 ⅜” x 7 ⅞” and the bottom platform is 9 ½” x 4 ⅛”.
The Plain Jain retails for $219.98
The Pinch Point is a premium one stick offering that features a unique design that allows a big portion of the top step to flip up out of the way. It’s offered in 12”, 14” and 16” lengths and weighs just under 5 pounds. The top platform offers plenty of foot room at approximately 14” x 10” and the bottom step is 9 ½” x 4 ⅛”.
The Pinch Point retails for $362.98
OOAL also released their new Anchor System for mounting cam cleats on climbing sticks that centralizes the attachment point on the stick and reduces the chance of kickouts. It weighs just 2 ounces, and retails for $34.95 each.
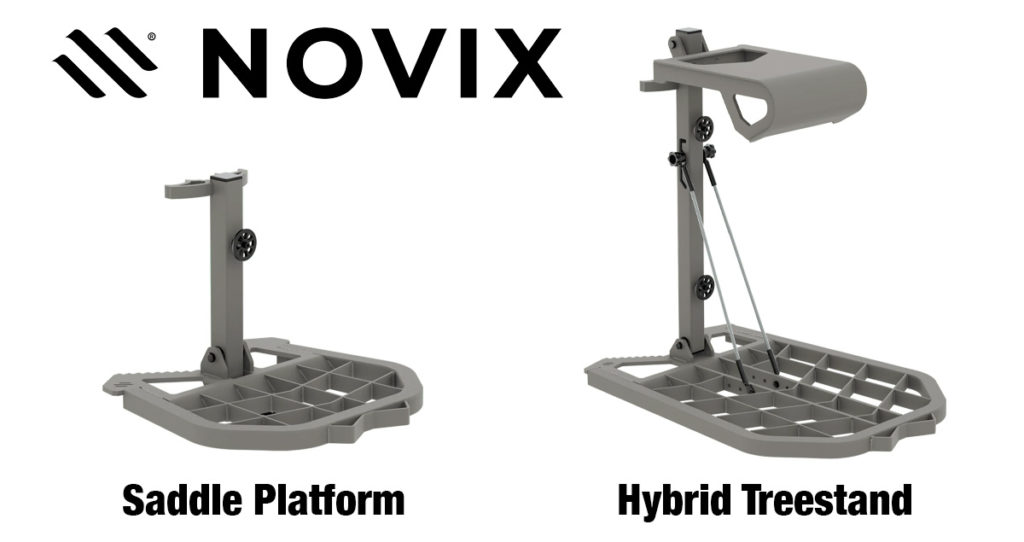
Novix
Novix introduced their new Raider Saddle Platform and Raider Hybrid Treestand at the ATA show.
The saddle platform provides 14.5” x 14.5” of footroom, weighs 4 pounds, and is rated for 300 pounds. The all aluminum platform is made in the USA and will retail for $189.99
The hybrid treestand is a unique design that offers a roomy platform and a very small seat to be able to sit down while saddle hunting. The platform is 22.5” x 16.375” and weighs 8 pounds. It will retail for $299.99.
TreeStyx
Brand new to the saddle hunting, TreeStyx created some buzz among saddle hunters with their 1 pound climbing sticks with built-in aiders. With four of the 20-inch sticks and the included raiders, a hunter should be able to reach 20 feet. The sticks feature plenty of foot room, easy stacking, and carbon reinforced polymer brackets. No word yet on the retail price of these sticks.
Latitude Accessories
Latitude released their new Carbon SS climbing sticks and Rebel platform prior to deer season, so new releases at the ATA show were reserved for some of their saddle hunting accessories. These include two new bow hangers, updated knee pads, and a cool glow-in-the-dark grip tape for their Carbon SS climbing sticks.
Us saddle hunters love lightweight gear, and Trophyline has seemingly set the bar with this new line, which was four years in the making.
“Our HyperLite series of platform and sticks are made of a new proprietary material called Magnite,” said Nick Betts of Trophyline. “Magnite is 33% lighter and 22% stronger, 110% harder, and has three times more vibration dampening that current aluminum.”
He went on to say that a carbon fiber stick with the same strength would be 50% heavier than the Magnite version.
HyperLite Climbing Sticks
With that in mind, let’s take a look at the specs on the HyperLite climbing sticks:
- 16 inches step-to-step
- 9 inches wide
- 3.4 inch step depth
- Weigh just 17.5 oz each (4.4lbs for a 4-pack)
- 300 lb weight rating.
- Suggested retail price of $449/4-pack
Additionally, the sticks have a quick and silent amsteel attachment method using new QuickHitch Tabs.
The sticks stack flat against one another, taking up just 5 inches of depth for four sticks.
And best of all, they are made right here in the U.S.
HyperLite Platform
As for the HyperLite platform, its specs include:
- 12” x 12” platform
- Weighs in around 2lbs
- Suggested retail price of $299
The platform has a similar design to Trophyline’s popular Onyx platform, but with all the reduced weight and improved strength benefits of the new Magnite material.
The leveling system has been updated and is now incorporated into the post. It can be adjusted with ease while in the tree.
When you combine the four sticks and platform, you now have a complete system that weighs less than 6.5lbs.
Trophyline’s new HyperLite climbing sticks and platform will be available this summer. They have not announced pricing at this point. We will keep you posted as more information becomes available!
DISCLAIMER: The prices listed for items in the directory are suggested retail prices as of January 2024, and may not reflect current retail or sale prices. Please check directly with the manufacturer for current pricing and availability.
If you see any errors in this guide, or if we’ve left your company out, please reach out to us at [email protected].
Hunting Saddles
Click on the company for a dropdown with products offered and contact information.
Climbing Sticks
Saddle Hunting Platforms

I was reminded of this last September when I read about the first saddle hunting fatality that I’m aware of. Dane Purcell, 43, of Dunlap, Iowa, was practicing using his saddle to prepare for the upcoming deer season, when something went terribly wrong. While climbing down, Dane somehow became inverted and was unable to right himself, causing him to suffocate.
Though extremely rare, these things do happen, and in most cases, they are 100% preventable. I don’t write any of this to create fear, but instead, I hope it makes you take every climb into and out of a tree seriously. There is zero room for error when hunting elevated.
In this article, we’ll look at 7 steps you can take to stay safe while saddle hunting. Most of these are simple, straightforward, and won’t cost you a dime on additional equipment. They simply require you to take the time and effort to stay safe. And we can all do that!
1. Buy good equipment
Saddle hunting is expensive, and I see a lot of new saddle hunters looking for ways to save money on their initial setup. And while I certainly understand the need to be frugal, doing so on equipment that literally holds your life in its hands is not the place to do so.
That’s not to say there aren’t safe, budget-friendly gear options out there, but make sure you are buying from a reputable company, and read as many reviews as possible to see if there are quality control issues.
With the increased popularity of saddle hunting, there are now lots of Chinese knockoffs hitting the market that resemble hunting saddles and saddle hunting gear from popular manufacturers.
Steer clear of these products.
Not only because they steal designs from other companies to make their money, but they also get to avoid the U.S.’s stricter safety guidelines.
2. Inspect your equipment regularly

Even great equipment can have flaws, and everything wears out with time. So inspect your equipment regularly to make sure it doesn’t fail you.
Preferably, you should do this before every hunt. It only takes a minute to look over your saddle, ropes, and accessories to ensure they are in good working order, with no signs of deterioration.
If you do find an issue with any of your equipment, either return it to the manufacturer if still under warranty, or throw it away. DO NOT risk injury or death because you think it will be good for another hunt or the rest of the season.
3. Practice at low heights
Saddle hunting is a whole different ball game than any other style of elevated hunting. There’s a learning curve even for experienced hunters. So I recommend practicing as much as possible before you actually start hunting from a saddle.
But there’s no need to practice while 20 feet in the air. Set your platform in a tree a foot or two off the ground, and get used to setting up, maneuvering, and shooting from your saddle. Once you’re comfortable at ground level, maybe climb up one stick high, and practice from a low elevation. Eventually, you’ll work your way up to hunting height, and by the time you do, you should be very familiar and comfortable with all your equipment.
4. Always stay attached to the tree
If you don’t follow any other advice in this article, at least do this step! Always stay attached to the tree when climbing or descending the tree. ALWAYS.
That may mean using a lineman’s rope around the tree as you climb and set your sticks and platform. Once you have your platform set, hook your tether rope to the tree, then connect it to your bridge rope BEFORE you remove your lineman’s rope.
You can do the same thing if you have to maneuver around a limb on the way up. When you get to the limb, attach your tether rope to the tree above the limb, and then connect the tether to the bridge rope on your saddle so you are connected to the tree. Then you can unhook your lineman’s rope just long enough to move it above the branch, and reconnect it to your saddle to continue your climb..
So while climbing (or descending) you should always be attached to the tree with either your tether or your lineman’s rope…or both!
5. Lose the lineman’s rope and use two tethers
While using a lineman’s rope is common and protects you from a full freefall from the tree, you can still fall while using one. It won’t stop you from sliding down the tree, it will only slow you down. So while it may save your life, you could still get seriously hurt.
A better option is to use two tethers rather than a tether and lineman’s rope. Going back to my days of using a climber, I would always have my tether around the tree and attached to my safety harness, moving it up the tree as I climbed.
You can do the same thing while saddle hunting.
As you hang and climb up your climbing sticks, move the tether up the tree with you. If you run into any limbs, you can do it exactly as described above, except instead of moving your lineman’s rope from below to above the branch, you’ll move your second tether while the first is still attached to you and the tree.
This method eliminates any chance of a fall. You are always attached to the tree with a tether rope, so if you fall, the tether will quickly catch you.
Yes, this method takes a little more time and effort, but it may mean the difference between sliding down a tree, scraping your body across multiple climbing sticks along the way, or being caught by a tether rope and quickly getting yourself back into a safe position.
6. Let someone know where you are and when you’ll be back
This is a great habit to get into regardless of whether you’re saddle hunting, treestand hunting or hunting from the ground. Every time I head into the woods to hunt, I send my wife a pin on Google maps of where I intend to be.
That way, if something were to happen to me, she would know where to send help. Otherwise, I could be out there hurt, or hanging in my hunting saddle for a long time waiting for help to find me.
There are other ways to do this, including using a realtime app like Life360, or just jotting down a map on a piece of paper. Regardless of how you choose to do so, just make sure someone knows where you’ll be and when to expect you back!
7. Take your time. It’s not a race.
Navy Seals have a saying: “Slow is smooth. Smooth is fast.” And while they may not have saddle hunting in mind when they say that, it certainly applies. As I mentioned earlier in the article, there’s no room for error when climbing trees, and the best way to avoid errors is to take your time and be methodical in your technique. Be smooth!
You should never feel rushed to get in the tree. If you do, it’s time to pause and take a moment to “reset.” You have all the time you need. It doesn’t matter if it takes you 15 minutes or an hour and 15 minutes. Just know your routine and plan your time accordingly.
During my three seasons of saddle hunting, I’ve developed a system. When I get to the tree I plan to hunt, I slowly unpack my gear and lay it neatly on the ground where I can easily access everything. I then slowly start attaching my climbing sticks to the tree, my platform to my saddle, and making my way up the tree.
I try to keep my focus on being safe and being as quiet as possible. Both are critical for success.
When the hunt is over, I simply repeat my system in the reverse order. Again, taking my time and focusing on safety and silence.
Share Your Thoughts and Tips
We’d love to hear about your saddle hunting safety experience. Have you had an accident or near-accident while saddle hunting? Have you experienced equipment failure? Or maybe you have a safety tip we overlooked.
Either way, we would love to hear from you in the comments section below.
]]>When it comes to saddle hunting, one of the most common questions I hear is, “How many climbing sticks do I need?” The answer to this question depends on a few factors, most importantly of which is how high you want to get in the tree.
In this article, we’ll answer that question definitively to help you decide what type of climbing sticks you need, how many you need, and whether or not you’ll need aiders to help you reach your desired hunting height.
What are Aiders?
If you’re brand new to saddle hunting and climbing sticks, then you’ll need to know about aiders. If you’re already familiar with them, feel free to skip down to the next section.
Aiders are additional steps for your climbing sticks made of lightweight rope, nylon, or cable. They resemble a rope ladder, and can add anywhere from one to four or more additional steps to your sticks.
While aiders are a great way to get additional height out of your climbing sticks, they also can increase your risk of a potential fall or mishap.
Due to their flimsy nature, it can be easy to miss an aider with your foot, or not get your foot in there good enough to hold your weight. They can also kick out from the tree if your weight isn’t perfectly balanced in the middle of the step, causing you to fall.
Our Test Method
To answer the question of how many climbing sticks you need, I ran a test with two- and three-step sticks, with and without aiders. For each test, I placed the bottom step approximately 18 inches off the ground, spaced the sticks 18 inches apart, and hung the platform approximately 18 inches above the top step.
My two-step sticks are 18” long, and my three-step sticks are around 36 inches long, which is why I made the spacing above the ground and between the sticks 18 inches. That accommodates an average height hunter being able to comfortably climb from step to step without having to overstretch.
Obviously a taller person could increase that spacing to get a little higher, and a short person may need to reduce that spacing a bit to climb comfortably. So your actual results may vary some from mine, but this is more about just giving you a good baseline for what equipment you need to start saddle hunting.
How High Could We Get?
Initial Test: (3) Two-Step Climbing Sticks
For my initial test, I used (3) two-step climbing sticks without aiders. By spacing them 18 inches apart and starting the first stick 18 inches off the ground, I was able to set my platform right at 10.5 feet.
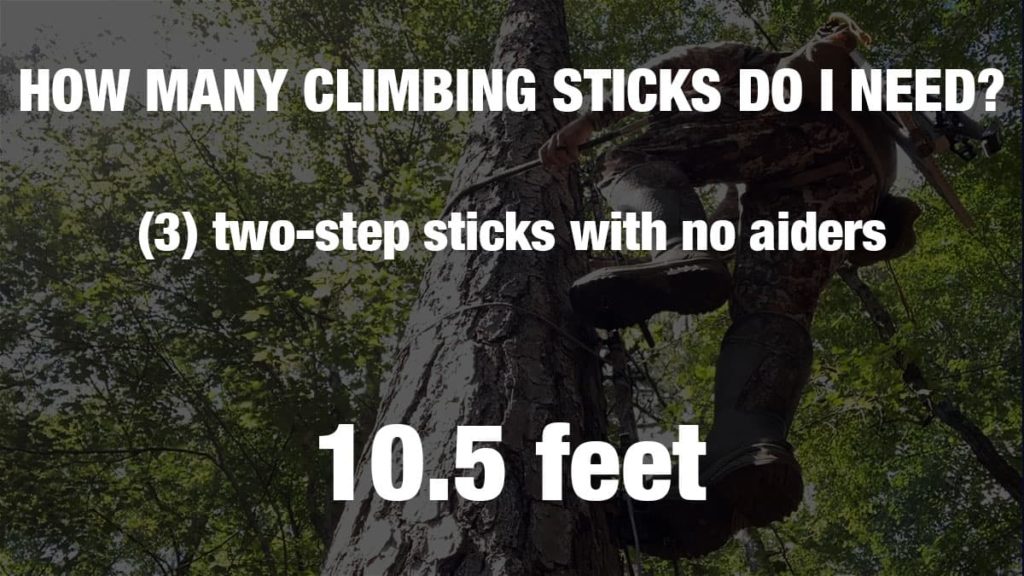
That’s not as high as most saddle hunters like to get, but it may be high enough for many setups. We’ll dive more into how high you need to get in the tree in a separate section below.
My next test involved the same three sticks, but this time I used one-step aiders on each stick. That essentially made them three-step sticks. Again, we made the first step (bottom aider) 18 inches off the ground, separated the sticks with aiders 18 inches apart, and set the platform 18 inches above the top step.
This time we were able to get the platform 14.5 feet high. That’s getting closer to the 15-20 feet that seems to be many saddle hunters’ sweet spot.
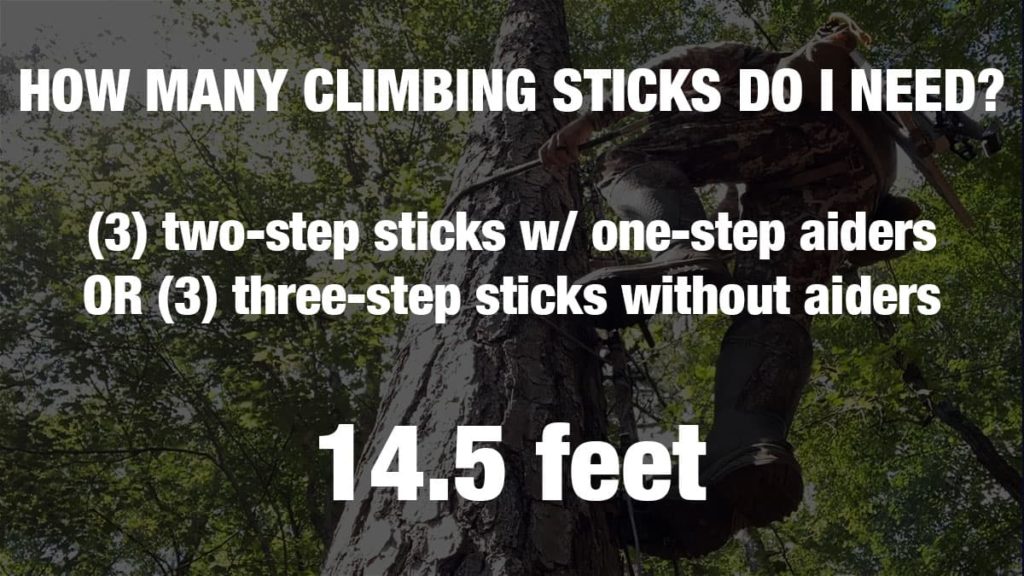
Next Test: (3) Three-Step Climbing Sticks
Next I put my three-step sticks to the test. There was no need to run a test with just the steps without aiders, because that’s exactly the same setup as the two-step sticks with single-step aiders.
So if you use (3) three-step climbing sticks without aiders, you can expect to get around 14.5 feet high at platform level.
My last test was the (3) three-step climbing sticks with one-step aiders on each. Spaced the same as the previous tests, you should be able to get your platform about 19.5 feet off the ground. That’s getting high enough to handle most any saddle hunting situation.
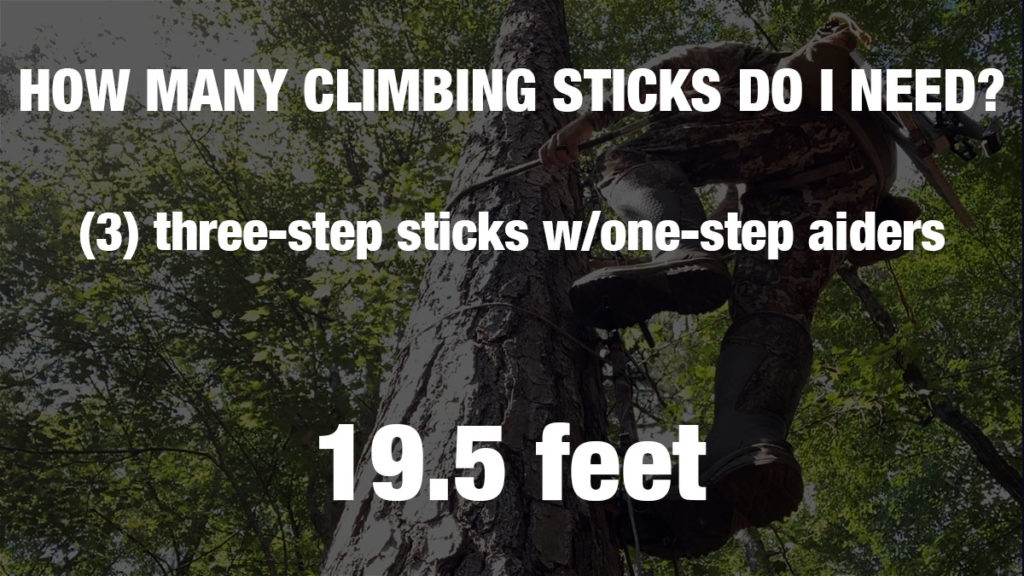
Other Aider Options
For those who want to climb higher, adding another stick or using three-step climbing sticks with multi-step aiders would be necessary. However, I recommend not going above a one-step aider on the second, third, or fourth sticks for safety reasons. You’re better off adding an extra stick rather than risking a fall and injury.
How High Should You Deer Hunt?
This is another common question among new saddle hunters, as well as treestand hunters. And the answer is a disappointing, “It depends.” There are a few considerations before determining this answer for yourself:
- How high are you comfortable climbing?
- How many climbing sticks can you afford to buy?
- How high is the surrounding cover?
No matter what equipment you have or how serious you are about killing a deer, never climb higher than you’re comfortable hunting from. Not only does that take all the fun out of hunting if you’re fearful the whole time you’re in the tree, but it also creates an unsafe situation. There are plenty of methods to shoot deer without having to climb to an uncomfortable height.
The next question you have to consider is your budget for climbing sticks. You may be comfortable 25 foot in the tree, but if you can only buy (3) two-step sticks right now, you’re not going to be able to hunt that high. And that’s okay, because you don’t have to. You just need to hunt as high as the cover, and that’s our third consideration.
I hunt with (3) two-step sticks with one-step aiders on each. So I can get around 15 feet high. And I rarely feel like I need to be any higher than that. In fact, there’s been multiple times I had to leave a stick laying on the ground because I only needed two.
That’s because I intentionally seek out trees with decent cover closer to the ground — at maybe 8 to 10 feet. That cover can be branches in the tree you’re climbing or cover from an adjacent tree or shrub. I’ll choose being 10 feet high with good cover over 20 feet high with no cover every time.
]]>
About the CRUZR XC
My first impression upon receiving the CRUZR XC hunting saddle was that the quality of the material seemed very high-end, and the craftsmanship was excellent. It felt like a saddle that would last a long time and withstand the thickest of thickets without getting damaged.
The CRUZR XC is somewhat of a hybrid design between a single-panel and a two-panel saddle. While it is technically just one panel, that panel has a large pleat in the middle that allows it to expand. So you get the comfort of a two-panel design with the simplicity of a single panel.
The XC is equipped with an adjustable Amsteel-Blue bridge (in black fibers), quick-release buckles, and two rows of molle loops to easily attach accessories.

The saddle weighs right at 3.2 pounds and has a weight rating of 300 pounds to accommodate most saddle hunters.
Sizing Chart
The CRUZR XC is offered in the following sizes:
- Size 1 for 28-33 inch waists
- Size 2 for 34-38 inch waists
- Size 3 for 38-42 inch waists
The CRUZR XC is offered in two color options: black or grey.
Performance in the Field
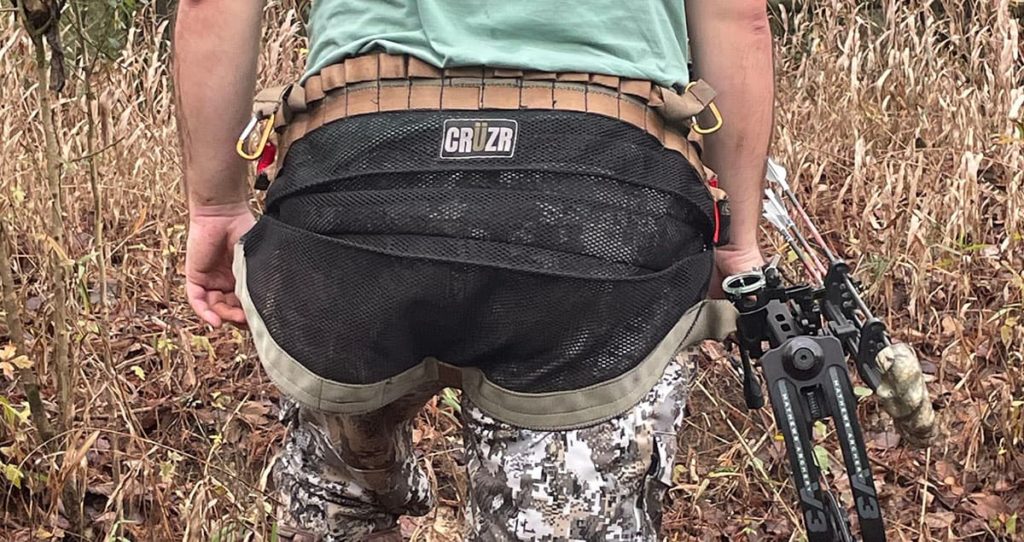
After using the saddle for nearly a whole season, what’s impressed me most about the CRUZR XC is the minimal amount of hip pinch I experience with this saddle compared to ones I’ve used in the past.
I haven’t had to make any major adjustments using this saddle. With all my previous saddles, I could never seem to get rid of hip pinch on long sits no matter what I did. I would also experience back pain with my previous saddles, even when using a back band. The XC’s pleated expansion chamber has solved both of these issues for me.
One thing I would like to see changed on the CRUZR is the quick release buckles. While I like the method of connecting your belt and leg straps, the metal buckles can be very noisy in the field. And no one wants to hear that dreaded sound of metal clanking on a quiet morning.

Pros and Cons
Pros
- High quality materials and construction
- Pleated design provides the comfort of a two-panel saddle with the simplicity of a single-panel
- Made in the USA!
- 30-day money back guarantee
Cons
- Metal buckles can be noisy while setting up and hunting
About CRUZR
CRUZR Saddles were founded in 2018 by Chad Rice. His first hunting saddle was sewn on a home sewing machine in the garage of his home. Chad tested that saddle during the 2018 deer season before moving on to industrial-grade sewing machines to start cranking out commercially available hunting saddles.
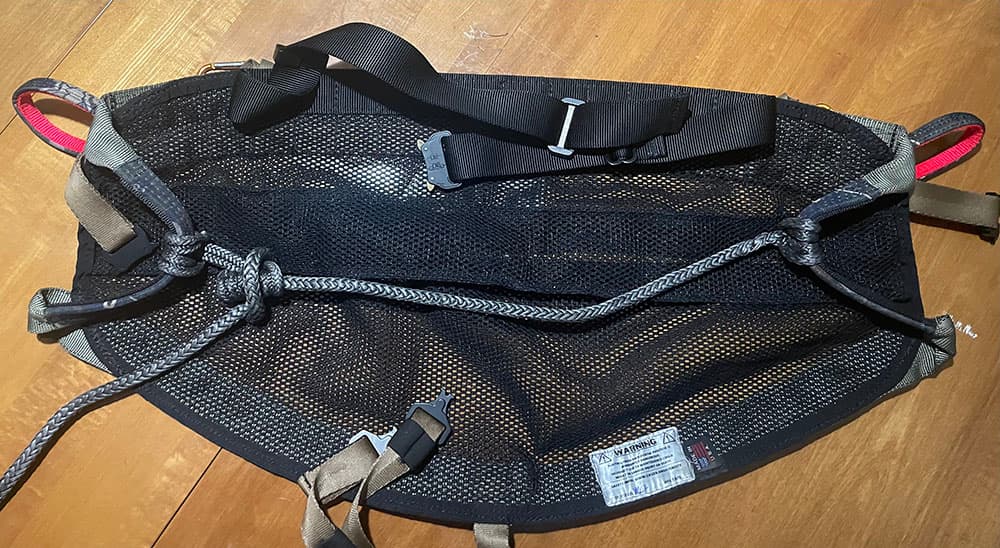
CRUZR saddles are manufactured in the U.S.A in Tennessee and come with a 30-day money-back guarantee if you aren’t satisfied.
Contact CRUZR
CRUZR
1380 N. Washington Ave., Suite B
Cookeville, TN 38501
(833) 278-9792
Final Thoughts
Six years into saddle hunting, and I’ve yet to find another saddle that provides the level of comfort that I get with the CRUZR XC. And at a price point of $260.00, I don’t think you can beat it.
I have a feeling the XC will be in my mobile deer hunting arsenal for years to come.
]]>I ordered the option with an open bridge, and it shipped in less than 12 hours and arrived at my door just four days later.
First Thoughts
When I opened the package I was immediately impressed with the craftsmanship of the panels and stitching. It is obvious Buzzard Roost takes pride in their product.
The ingenuity of the bridge loops adjustment method is impressive as well. Two amsteel prusiks on each side tied into an open bridge is no small feat, but they got it right.
I liked the lightweight mesh fabric and the overall weight of the saddle at about two pounds, making it comparable to the other saddles I’ve owned. I also like the pliability of the straps, which were much less stiff than others I’ve hunted from.
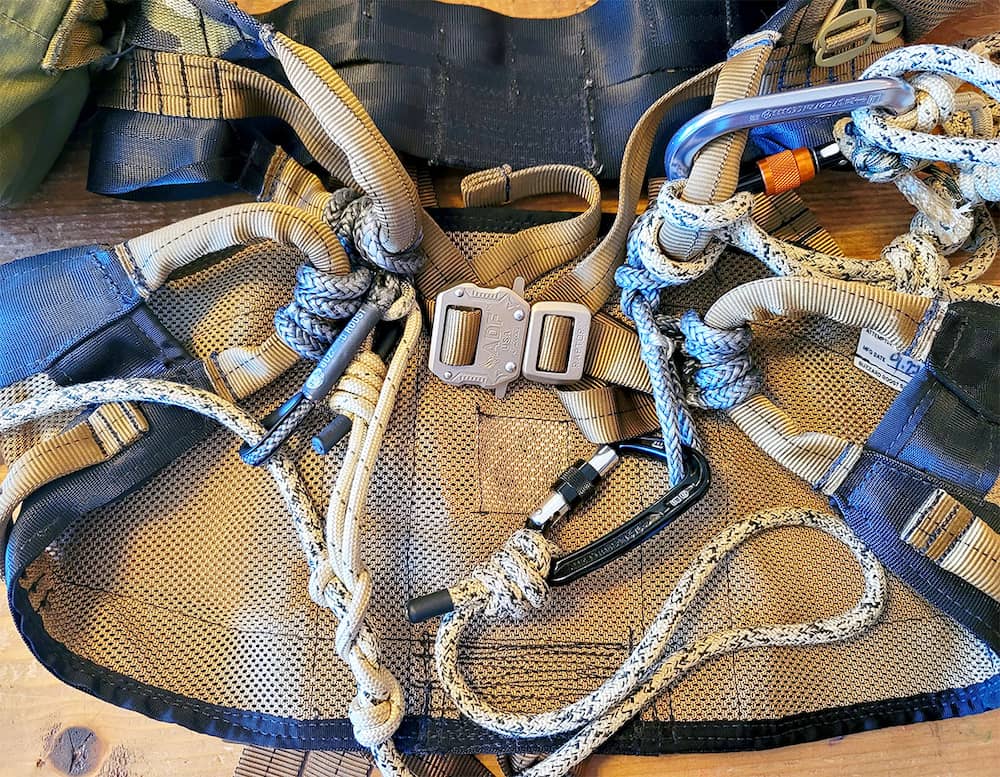
Overall Performance
After a few test sits in the yard, I started to think I should have ordered the next size up, as I wasn’t finding the comfort others have bragged so much about.
I called Buzzard Roost and Benny (the owner) answered while driving down the road. We talked for a good 30 minutes, during which he offered his advice on adjustment and offered to exchange the saddle if I desired.
I continued to play with the adjustments and found the comfort I’ve been looking for, spending several all-day hunts in the saddle this season. The adjustments to the pull angles on the bridge loops are very sensitive, enabling the fine tuning for comfort that I hadn’t found in my 10 years of saddle hunting, using four different saddle companies’ products.
The Aerohunter Kestrel and Tethrd Mantis and Phantom saddles all had significant hip pinch for me. The Latitude Method 2 saddle was much better, but the adjustment opportunity on the Buzzard Roost is far and away better due to the ability to make micro adjustments and user-friendly design they incorporated into the bridge loops.
I might note that all these adjustments can be made in the tree while hunting.
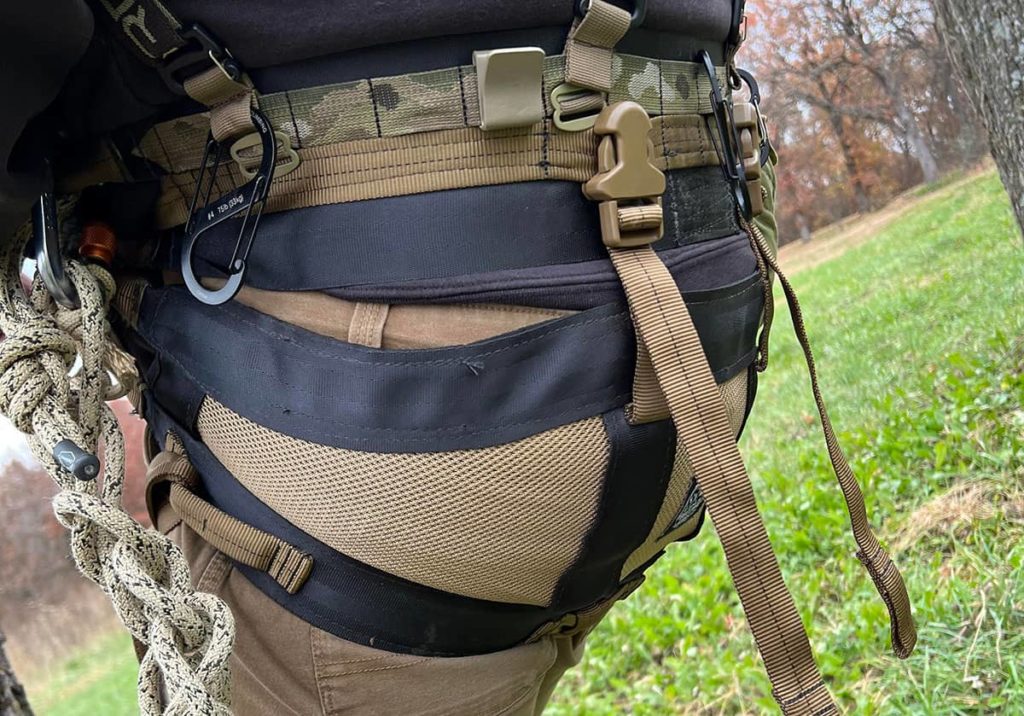
Buzzard Roost Specs
The Buzzard Roost Saddle is a true two-panel saddle. The patent pending design is two individual panels joined at a common fulcrum. This allows the individual panel angle to be adjusted independent from the other panel. Comfort can be dialed in for both leaners, sitters, high and low tethers.
The Buzzard Roost also has the one-stick saddle hunting enthusiast in mind, with safety stop loops on both hips for right and left handers. These loops also serve as leg strap attachment points, and are convenient for adjusting the lower panel into position.
The waist belt sports a one inch dual bar adjustment Raptor Buckle. The buckle can be worn in the middle or offset to either side.
The saddle bridge is made of 8mm Teufelberger Resc Tech Rope. Adjustment is made with an Amsteel Prusik.
Buzzard Roost sizing is as follows:
- Small: 26- to 32-inch waist
- Regular: 33- to 36-inch waist
- Large: 36- to 42-inch waist
- XL: 43+ inch waist
For reference, I ordered a regular, as I wear a size 34/35 waist in pants. I believe a large would fit me better as I have a bigger belly and could stand for the top panel to be larger. However, after hunting this season in it, I believe either size works as the saddle runs true to pants size.
What I Like
Overall, the Buzzard Roost Saddle is by far the most comfortable and adjustable saddle I’ve ever hunted in. I am a combination leaner/sitter, and found that separating the panels by 1.5″ or so I can do both without adjusting the panel gap at all while hunting.
The open bridge is perfect and a really neat design. The panels are easily adjustable to almost 12 inches of separation if you desire, although I haven’t found a need for that much as of yet.
Buzzard Roost’s pricing is competitive as well. They came in cheaper in factory offerings than several competitors with two-panel saddles.
What I Don’t Like
The only con I can find to this saddle is the leg straps. I’m unable to wear the straps while walking in or out due to the low angle they have when attached. Instead I clip the straps out of the way until climbing, which works great. Once on the tree I have zero discomfort with the leg straps.
Final Thoughts
I’ve been extremely happy with the comfort and quality of my Buzzard Roost saddle so far. Hats off to Benny and his team for the design and craftsmanship they put into their product, along with top notch customer service!
If you’re in the market for a two-panel saddle for next season, be sure to check out Buzzard Roost before you make your final decision. I’m sure glad I did.
]]>It has a retail price of $349.99, but is currently on sale for $299.99.
While demand seemed to be high, they are still showing in-stock on Tethrd’s website as of today (11/27).
Some saddle hunters have questioned if carbon fiber will hold up to the demands of a platform, but Tethrd partnered with one of the top carbon fiber manufacturers in the country, known for high performance race cars and off-road vehicle engineering. The platform uses a proprietary compound known as Tetra CF2 for parts certified to hold up to 4x the required standard at a lower weight than aluminum.
“This makes the Predator CFX platform the most bad a**, tough as nails, top of the line carbon fiber product in the industry,” it says on Tethrd’s website. “Our unique Carbon Fiber Forged process makes this the strongest, lightest, and quietest platform we’ve ever made.”
Like their Predator and Predator XL aluminum platforms, the CFX has a weight rating of 300 pounds.
Based on initial demand, there is little doubt that Tethrd will sell out of their initial limited quantity. So if you’re considering pulling the trigger, you better do it now. You can check out the Predator CFX XL platform on Tethrd’s website at this link.
And for those wondering, yes, it is made in the U.S.A.
In this article, we look at a few reputable sources for saddle hunting gear where you can often save on shipping, and possibly find things in stock that are on backorder from the manufacturer.
So if you’re in the market for new gear this fall, be sure to check out these retailers before you spend your hard-earned money. You can thank us later!
GoWild
You may know GoWild as a social media community for outdoor enthusiasts. And it is! But it’s also a large ecommerce shop with a wide variety of hunting supplies — including saddle hunting gear.
What we like about GoWild:
- Decent saddle hunting inventory
- Free shipping on orders over $50
- Generous 60 day return policy
GoWild offers products from Hawk, Tethrd, Latitude, Trophyline, and even Timber Ninja. Saddle hunting products include saddles, platforms, climbing sticks, plenty of accessories, and packs.
The large ecommerce store offers competitive prices, as well as free shipping on orders over $50. And let’s face it, you’re not going to order any saddle hunting gear for under $50 anyways!
GoWild has a bonus points reward program for users of its app. You can earn points by posting content on GoWild, making purchases on GoWild and referring friends to download GoWild with your share link.
Content that can earn points includes but is not limited to posting Trophies, Time Logs, Regular Posts (more points for gear tagged!), adding your first Gear Setup, and Gear Reviews. There are also challenges that appear on Members profiles from time to time for additional Rewards points.
GoWild has a very generous return policy as well. If you’re not satisfied with your GoWild Direct purchase, you can return it for a replacement or refund within 60 days of purchase.
Black Ovis
From the same company that brought you the Camofire.com flash deal website, comes giant hunting ecommerce site Black Ovis.
What we like about Black Ovis:
- Huge inventory of hunting gear
- Free domestic shipping on orders over $50
- 30-day return policy
Black Ovis has a huge inventory of hunting gear, and carries Tethrd, Trophyline and Hawk saddle hunting gear. While they may only carry three brands, they have a great selection of gear from each.
Black Ovis provides fast shipping, often going out the same day. Ground shipping is free on domestic orders over $50, which means it will arrive via FedEx or USPS.
While their return policy is not quite as generous as GoWild, they still offer a 30-day window to send your items back.
You can save 10% off your first order with them if you sign up to receive their SMS text messages.
Amazon
Chances are you already have an Amazon account. In fact, you’ve probably bought some hunting gear from there at some point. What you may not know is that more and more saddle gear manufacturers are offering their gear for sale there.
Hawk and XOP offer a variety of gear there, including saddles, platforms, and climbing sticks. Latitude and Tethrd both offer a limited supply of accessories.
You’ll also start to find quite a few Chinese knockoff saddles that look uncannily similar to the Tethrd Phantom. However, I DO NOT recommend trusting your life to a Chinese knockoff. There’s too much on the line, and a saddle or rope failure could have disastrous results.
Shipping is typically free for Amazon Prime members, and I’ve never had an issue returning items to Amazon for refund or replacement.
Saddle Manufacturers
The most common source of saddle hunting gear comes from the manufacturers themselves. Most of these companies started as direct-to-consumer, and are just now expanding into retail locations like Amazon and other online and brick-and-mortar retailers.
There’s absolutely nothing wrong with buying direct from the manufacturer. It’s just that the manufacturer is often the first to sell out of product, and the last to offer any type of discount.
If you do decide to buy direct, here’s a look at the shipping and return policies for some of the major saddle manufacturers.
Tethrd
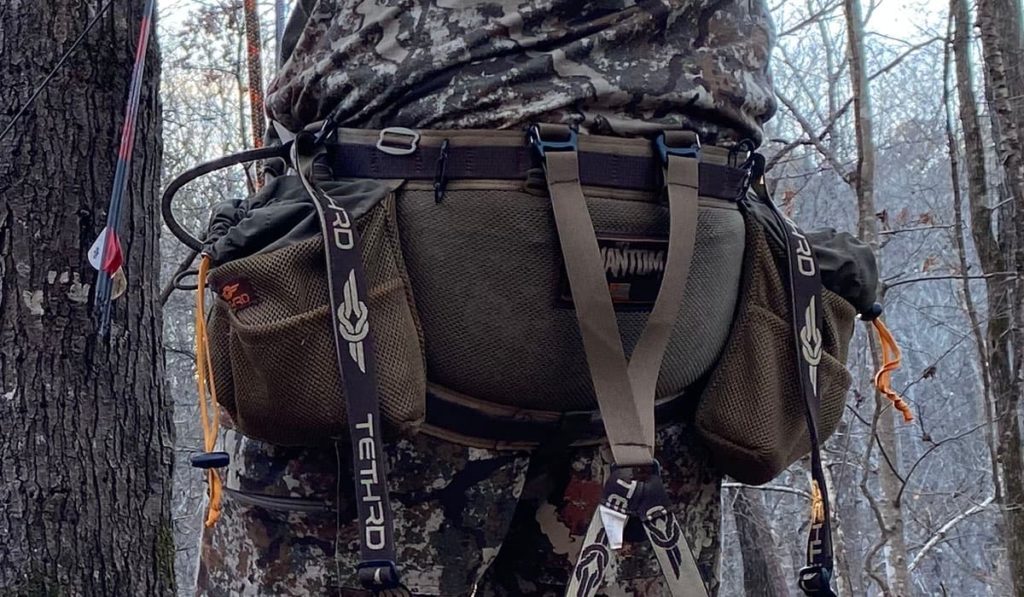
According to their website, Tethrd usually ships in-stock items within three to five business days. Backordered items can vary, so you’ll have to refer to the specific product page for lead time.
Sample Shipping Cost
Tethrd Phantom Kit
- $9.69 USPS Ground Advantage
- $20.63 UPS Ground
- $92.22 UPS Next Day Air
They ship everything via UPS and USPS, and offer multiple options when checking out. Most orders take between two to seven days to arrive at their destination.
If you’re not satisfied with your order, Tethrd has a 30-day return policy to start a claim. After the 30 day window, it is at the company’s discretion. Once you’ve made your claim, you’ll have 14 days to ship the order back to Tethrd.
Tethrd will cover shipping costs to return warranty and defect issues, but you pay shipping to return items you’ve changed your mind on.
Latitude
Latitude does not offer shipping speed information on their website. They do offer standard shipping as well expedited (1-2 day) shipping. The expedited shipping comes at a premium ($59/50 for a Method 2 saddle kit to my address in Georgia).
Sample Shipping Cost
Method 2 Kit
- $12.65 standard
- $59.50 expedited
For all online orders, Latitude offers a 30-day, satisfaction guaranteed return policy, effective upon receipt of your item. Tracking information will be used to determine the date with which the item was received for eligibility.
To be eligible for a full refund, your item must be in the same condition that you received it, showing no signs of excessive wear and tear or damage and must include any tags shipped with the item.
Customers are responsible for the cost of return shipping, tracking information, and lost or stolen return shipments.
CRUZR
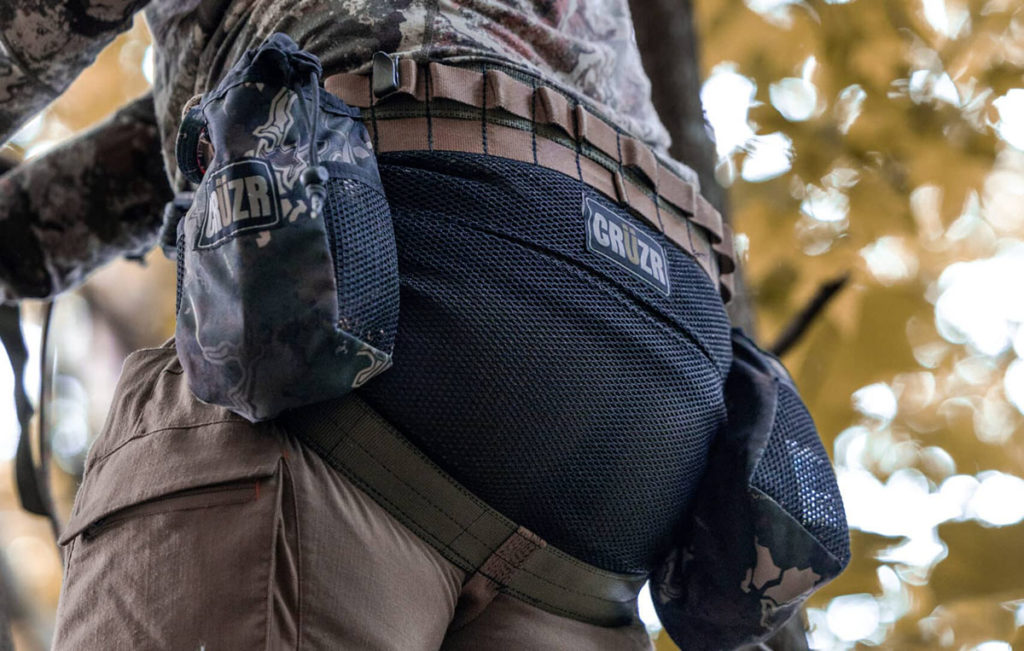
CRUZR prides itself in shipping orders quickly. Most in stock items ship out within the same or next business day, unless otherwise specified.
For backordered merchandise, the order will ship out when the backordered merchandise becomes available, usually within the indicated lead time.
If only a portion of your order is backordered, the in-stock merchandise may ship sooner, with the remaining items shipping separately once they become available for shipping.
CRUZR offers free shipping on orders over $300.
Sample Shipping Cost
CRUZR Archon Saddle Kit
- Free (on orders over $300)
- Flat Rate $14.00
As far as returns, if you’re not completely satisfied with your purchase for any reason, you can return it to CRUZR for a full refund or exchange within 30 days of the purchase date. The item(s) must be in new/unused condition with all original tags and labels attached.
Trophyline
Trophyline is another popular saddle manufacturer. While I couldn’t find anything on their website about shipping times, some of the reviews indicate they do a good job getting items out the door quickly.
At the time I write this, they are offering free shipping on all items. I don’t know if they always do that, or if it’s a temporary promotion, but I tested it with a Venatic saddle kit, and it indeed showed up in my cart as free shipping.
Sample Shipping Cost
Trophyline Venatic Saddle Kit
- Free
Trophyline’s return policy is the same as the other manufacturers discussed on here: You may return or exchange any Trophyline product for any reason within 30 days of the purchase date.
Trophyline does cover shipping on domestic order returns, which is nice.
TX5 Custom Gear
TX5 is a little different from the other manufacturers on our list, because they offer customization on all their hunting saddles. Because of that, there is a 4-6 week lead time on most saddles.
Accessories may ship quicker, and TX5 is good about giving you a lead time estimate on all orders.
TX5 offers a variety of shipping options, though none of them are free. Here’s what I came up with for my sample order of a Lonestar 2.0 saddle:
Sample Shipping Cost
Lonestar 2.0 Saddle
- USPS Priority $13.81
- UPS Ground 18.34
- USPS First Class $30.00
- USPS Priority Mail Express $49.50
- UPS 3 Day Select $51.36
- UPS 2nd Day Air $63.84
- UPS Next Day Air $148.71
TX5 has a 15 day return policy on new/unused products from date of delivery. After the 15 day window it is at the company’s discretion to accept a return/exchange.
The customer is responsible for all shipping costs when returning/exchanging products. The company says it’s the customers responsibility to notify them when returns/exchanges have been shipped and to provide them with tracking information.
Returned/Exchanged items must be in new/unused condition or the customer may be subject to a 15% restocking fee.
Final Thoughts
As the popularity of saddle hunting continues to rise, I have to believe gear will become much more readily available. At some point, you’ll probably be able to walk into your local Bass Pro or Cabela’s and try on all the latest saddles.
Until then, you’ll just have to make due with the few companies out there offering saddle hunting gear. Fortunately there are a few great options beyond just buying direct from the manufacturer.
These alternatives often offer discounted prices, free shipping, and generous return policies, so don’t be afraid to give them a try!
]]>We’ll break down the costs of all the essentials as well as popular accessories, from budget options to the best of the best. From there, you’ll be able to decide if this unique style of hunting is right for you, and what you’ll need to budget to get started.
Basic Equipment
There are three basic pieces of saddle hunting equipment that you’ll need to get started. I’ve broke them down by price below.
| Item | Budget Price | High-End Price |
|---|---|---|
| Saddle Kit | $200 | $500 |
| Platform | $70 | $300 |
| Climbing Sticks | $100 | $400 |
| TOTAL | $370 | $1,200 |
Saddle Kit
You have two options for getting the first three pieces of gear: buy each of them separately or buy a saddle kit from one of the many saddle manufacturers. These kits typically include the saddle itself plus necessary ropes and carabiners.
Expect to pay between $200 and $500+ for your saddle kit.
For $200, you can pick up one of the Hawk or XOP kits. Both will get the job done. They’re just not going to have all the bells and whistles – or the comfort level – of some of the higher-end saddles.
On the upper end of that spectrum are top-of-the-line saddles like the Tethrd Lockdown, CRUZR XC, or the Custom Gear Modifications (CGM) Cobra.
If you want a good balance between quality and price, then you should consider some of the great mid-priced options like the Latitude Method 2, Tethrd Phantom, or Trophyline Covert Lite 2.0.
Platform
You’ll need a platform to rest your feet on while you’re in the tree. Like saddles, these platforms come in a wide range of price points. Costs typically vary based on materials, size and weight. In general, the lighter the platform, the more expensive it will be.
The only platform on the market under $100 that I’m aware of is the Hawk Helium Apex platform at a price point of around $70. Most of the popular models are in the $150 to $200 range, but some can cost as much as $400.
If you want the best, then consider the Latitude Rebel SS platform. Despite its generous size at nearly 12 x 13 inches, it only weighs 2.7 pounds.
If you’re looking for some great mid-priced options, check out the Tethrd Predator or Predator XL for a little more room, the XOP Edge, or the Trophyline Mission.
Climbing Sticks

Obviously, you will need a way to get up and down the tree. Climbing sticks are the most popular option for that task, and like the other saddle gear we’ve discussed, they come in a variety of configurations and prices.
At the bottom end, Hawk once again leads the way with their Helium sticks at a price point around $100. On the other end of the spectrum are ultra-lightweight sticks like Tethrd Ones. They weigh less than a pound per stick and will set you back around $350 for a three-stick set.
There are several great options with prices in between the Hawks and Tethrd Ones. My favorites are the Latitude Carbon SS sticks at $239 for a set of three and Tethrd Skeletor sticks at $225 for a set of four.
Useful Accessories
Beyond the basics, a few key accessories can really improve your saddle hunting experience:
- Ascenders – Mechanical rope ascenders replace prusik knots for easier adjustment on fixed ropes. About $60 each.
- Back Band – A back band or “recliner” cradles your back when leaning or seated in the saddle, taking pressure off your tailbone and spine. Expect to spend around $20-40.
- Gear Bags – Gear bags or “dump pouches” mounted on your saddle allow easy access to small gear like your bow release, rangefinder, headlamp, and others. Expect to spend around $20-30 each.
- Gear Strap – Gear straps go around the tree to hang your things for quick access like your binoculars, rangefinder, grunt call, backpack, and other accessories. Again, expect to pay $20-30.
- Bow (or Gun) Hook – You’ll need a place to hang your weapon of choice in the tree. These come in a variety of options like the typical screw-in hanger to special hangers that integrate with the gear strap. Expect to pay anywhere from $15 to $30.
- Backpack – You’ll need a sturdy but comfortable backpack to haul your saddle gear into the woods. You’ll want to make sure the pack will securely hold all your saddle gear in place. Packs range from $60 for a great option from TideWe to $300+ for premium packs.
With accessories, expect to spend $250-500 more, bringing total costs for a complete setup to $600 on the low end up to $1700 or more for high-end choices.
| Accessory | Price Range |
|---|---|
| Ascenders | $120.00 |
| Backband | $20-40 |
| Gear Pouch | $20-30 |
| Gear Strap | $20-30 |
| Bow Hanger | $15-30 |
| Knee Pads | $20-70 |
| Saddle Pack | $70-300 |
| TOTAL COST | $285 – $620 |
The Used Gear Option
For hunters trying to save money, used gear can provide an excellent value. Saddle hunting is a gear-intensive pursuit. Avid hunters often upgrade to the latest equipment, flooding the used market with almost-new saddles, platforms, climbing sticks, and accessories.
Check saddle hunting forums and Facebook groups to find deals. Ask sellers lots of questions and ask to see dated photos. This protects you against potential scams. Inspect used gear carefully upon delivery.
Final Thoughts
As you can see, getting started saddle hunting requires an investment. But virtually any budget can get you geared up. Focus first on quality gear to protect yourself while elevated in a tree.
Do your homework to find the best gear you can afford. Consider used equipment as well to maximize value. With smart shopping, anyone can experience the fun of saddle hunting within their budget.
]]>